Submitting Antibodies
This page provides instructions for adding antibody validation data to the ATLAS-D2K Data Explorer. Antibody Tests (sometimes referred to as “Antibody Validation”) are specific comparisons of antibody performance on a tissue (e.g. human/mouse) with various fixation methods (e.g. frozen/paraffin). The results may help researchers select suitable antibodies for their work.
If you have any questions or feedback, please send them to your consortium’s help email: help@atlas-d2k.org
Table of Contents
Table of Contents
- Metadata Model for Antibodies and Antibody Tests
- 1. Joining the Globus Group
- 2. Overview of adding Antibody Tests
- 3. Search for the antibody you’re working on
- 4. If you cannot find the antibody, create a new Antibody record
- 5. Create an Antibody Test record
- 6. Add Test Summary Sheets and Antibody Test Images
- 7. Add Antibody Test Distribution terms
- 8. Reviewing and Submitting Antibody Data
Metadata Model for Antibodies and Antibody Tests
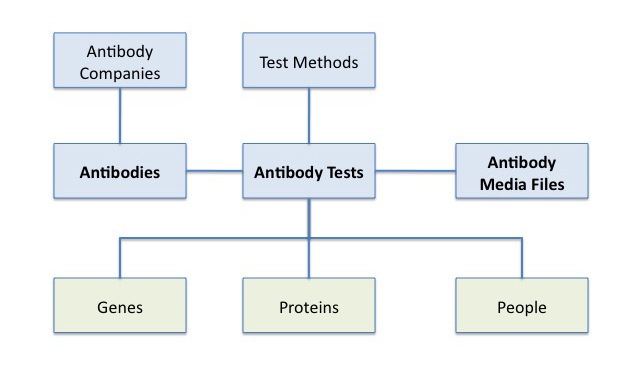
The Antibody schema contains two main tables:
- Antibodies: General product information about each antibody, similar to what might be found on the manufacturer’s website.
- Antibody Tests: Information about researchers’ experience using each antibody.
Other related tables include:
- Antibody Media Files: Images and other media files related to antibody tests (slide images, summary PDFs, etc.)
- Test Methods: Descriptions of the methods used in antibody tests.
- Various vocabulary tables.
1. Joining the Globus Group
To get editing access, join the relevant Globus group. Email help@atlas-d2k.org for assistance. For detailed information, see Accessing ATLAS-D2K Resources.
2. Overview of adding Antibody Tests
Adding antibody validation data involves the following steps:
- Search to see if the antibody for your test is already listed in our catalog.
- If you cannot find the antibody, create an Antibody record.
- Create an Antibody Test record.
- Add a Test Summary Sheet or Antibody Test Images. This is where you upload the PDFs and images that show the results of the test.
- Add Antibody Distribution terms to your antibody test record. These are the anatomical/cell type regions involved in your test.
Note: You may also “bulk add” or “clone” several test records if they are similar (ie, only the media type and outcome are different).
3. Search for the antibody you’re working on
-
Go to https://www.atlas-d2k.org/chaise/recordset/#2/Antibody:Antibodies and log in.
-
This will take you to the antibody search page, which you can use to find out if the antibody you’re working on is already listed in our database. Start typing the name of the antibody in the search field or use the filtering sidebar on the left to narrow down the results.
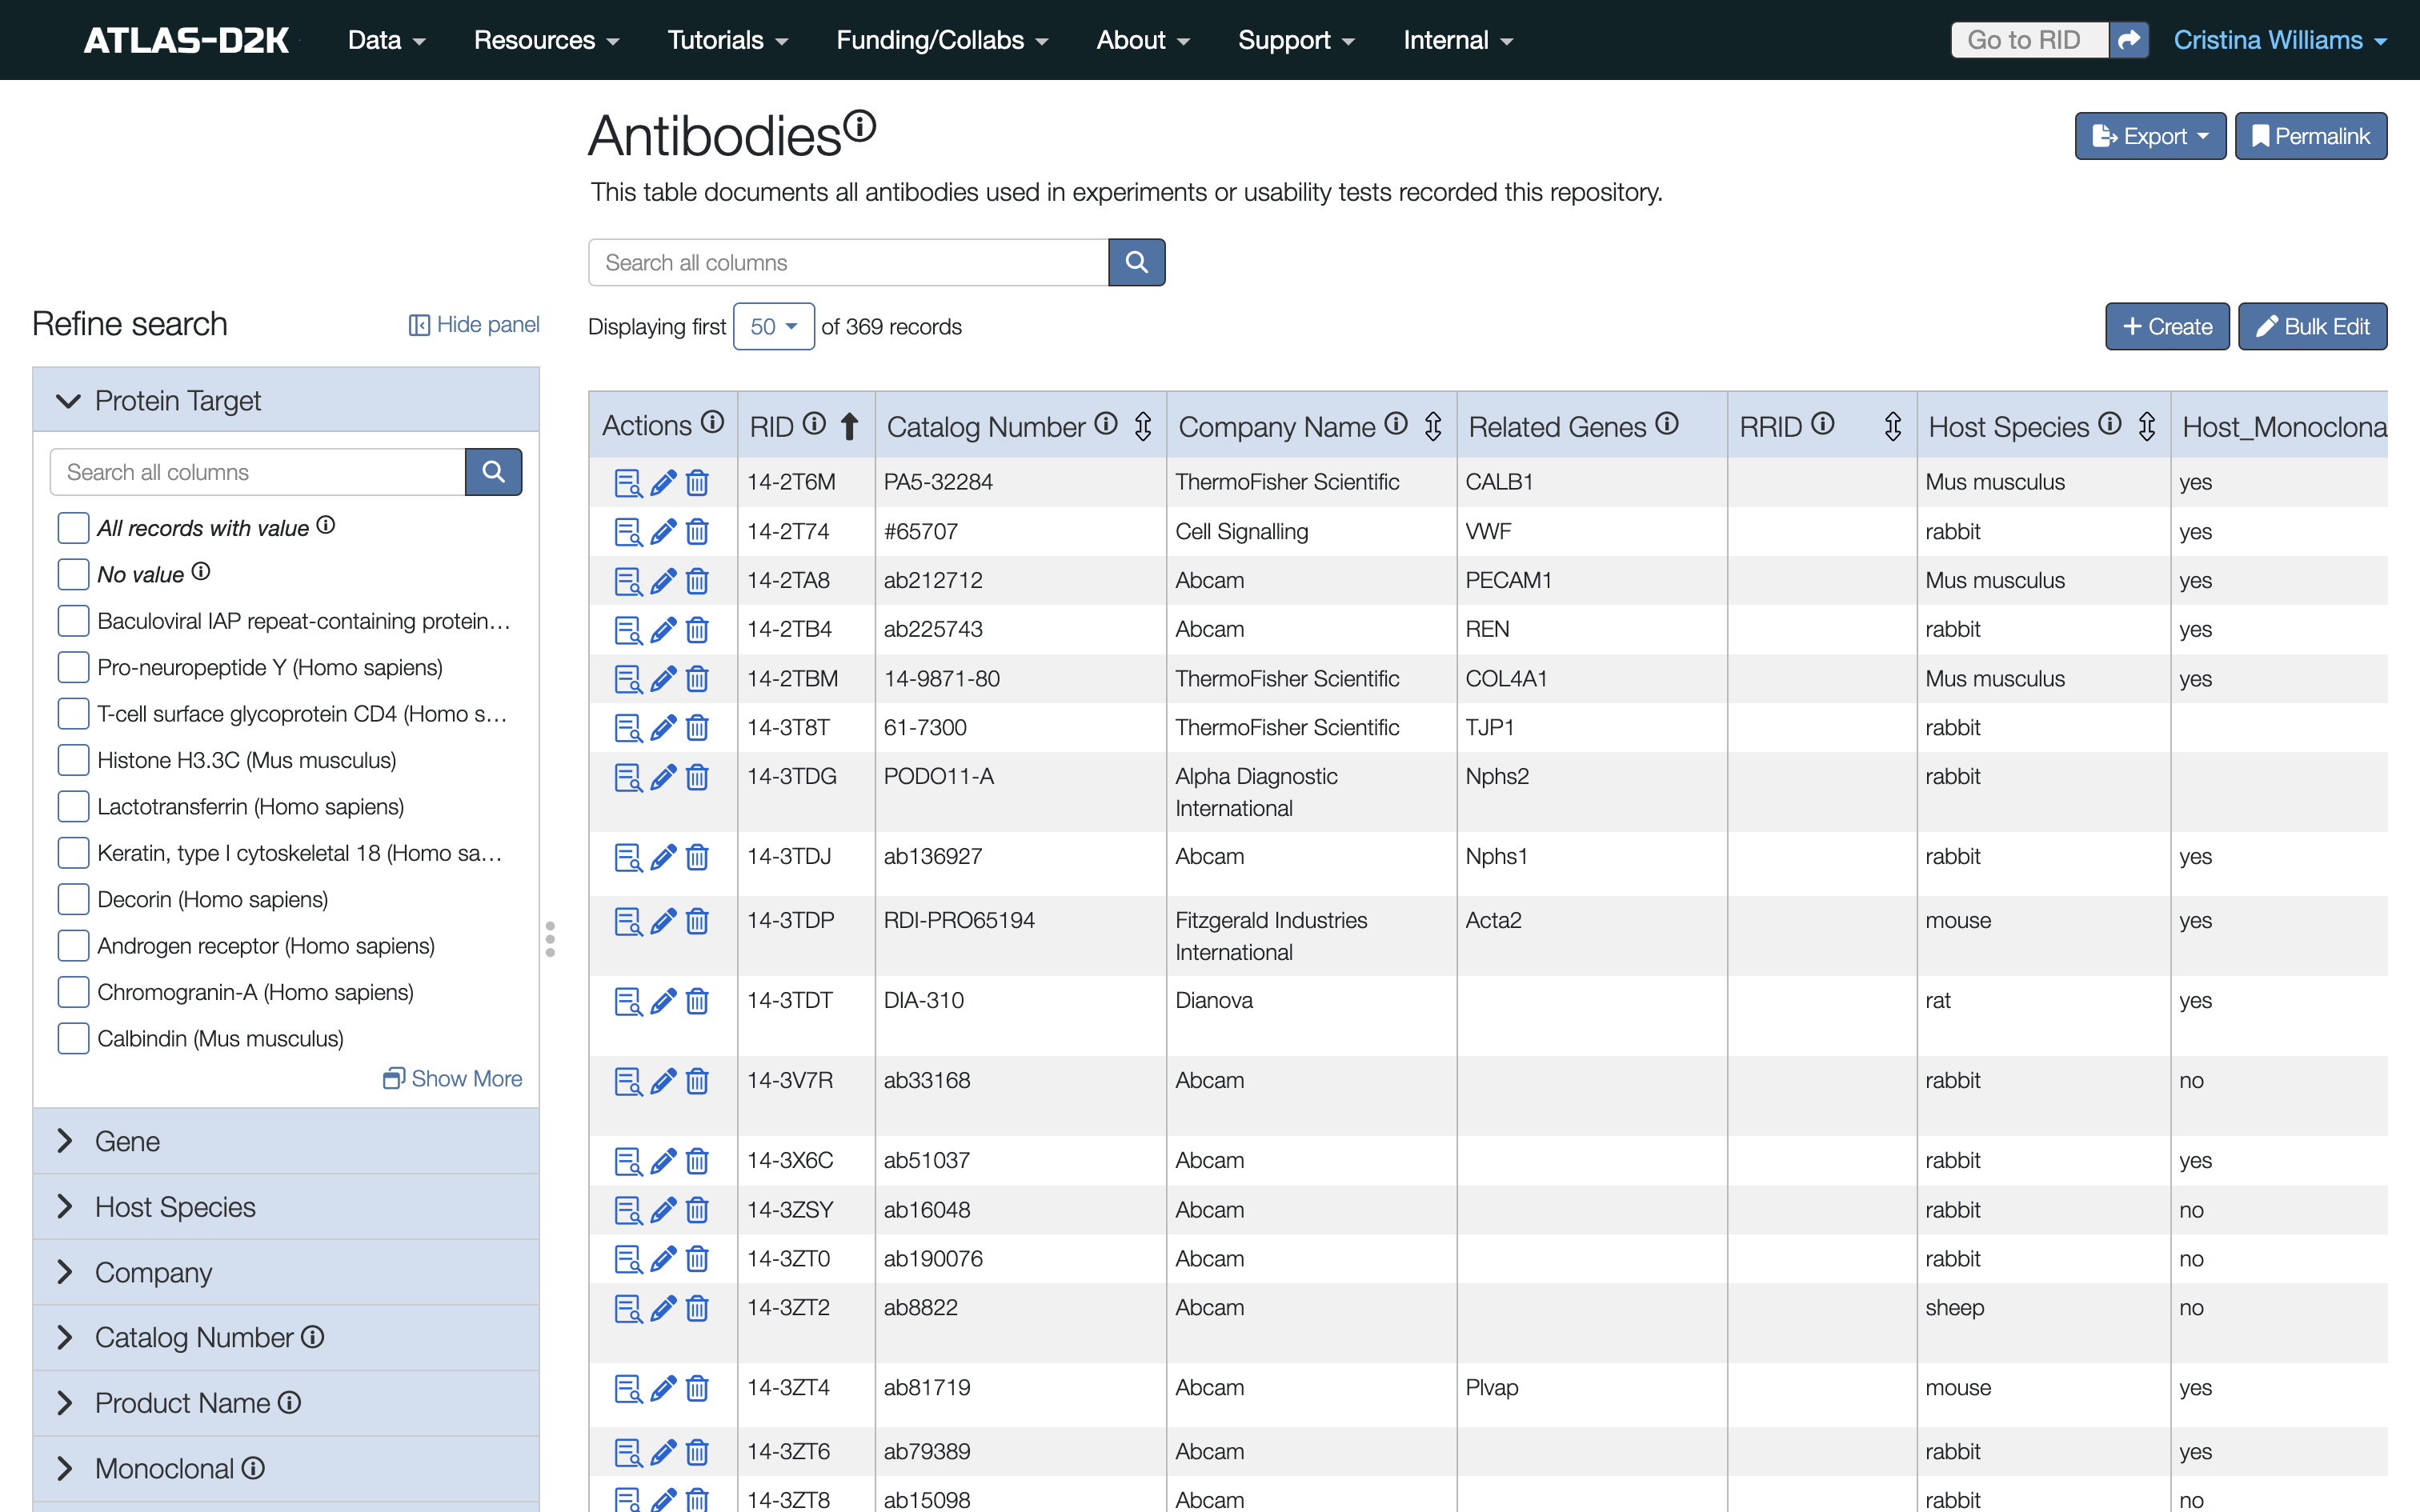
- If your antibody is there, go ahead and create the Antibody Test See Section 5 below. If not, move on to the next step below (section 4).
3.1 If your test involved lectin
Although lectin is not an antibody, the system treats it as one because most of the principles are the same.
4. If you cannot find the antibody, create a new Antibody record
If you did not find the antibody in our listings:
-
Click the
Createbutton. (If you are not on the Antibodies page, from the navigation bar, click Internal > Antibodies > Antibody Listing.)The
Create Antibodies Recordform opens in a new browser tab.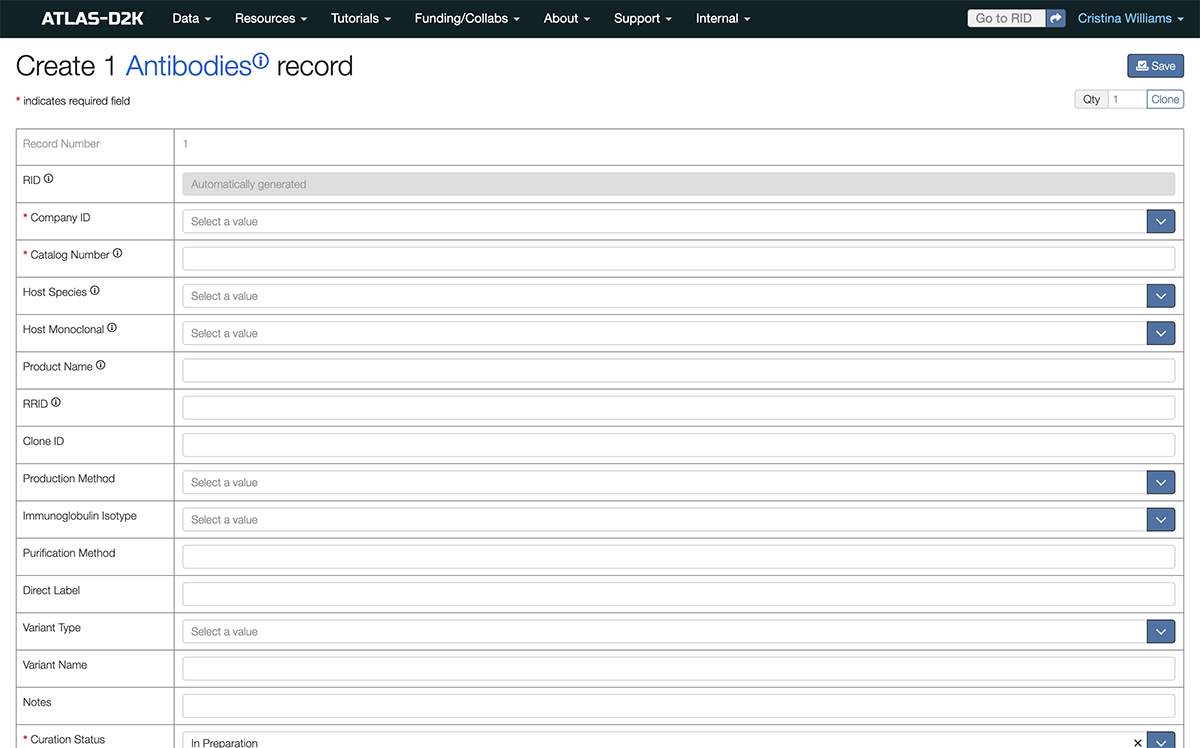
-
Select the values for each relevant field.
4.1 Fields for Antibody records
| Field | Description | Required or Optional |
|---|---|---|
| Company ID | TBD | Required |
| Catalog Number | TBD | Required |
| Host Species | The species from which this antibody was derived. | Optional |
| Host Monoclonal | Select true if this antibody is monoclonal. | Optional |
| Product Name | The product name of this antibody. | Optional |
| RRID | Research Resource IDentifier of this antibody. | Optional |
| Clone ID | TBD | Optional |
| Production Method | TBD | Optional |
| Immunoglobin Isotype | TBD | Optional |
| Purification Method | You can link to the related protocol. | Optional |
| Direct Label | TBD | Optional |
| Variant Type | TBD | Optional |
| Variant Name | TBD | Optional |
| Notes | Use this text field for your own notes that you wish to add. | Optional |
| Curation Status | Indicates if this record is still being worked on, is being reviewed, is embargoed until publication or has been released to the public. For a complete description of the curation process, see Curation Workflow | Required |
| Principal Investigator | Use the primary Principal Investigator for this collection of data. You may only indicate one PI. | Required |
| Consortium | Indicate the Consortium (GUDMAP or RBK). | Required |
- When finished, click
Saveto save your new antibody record.
4.2 What if my antibody is not from a vendor?
If your antibody is not from a vendor (ie, it’s a donated reagent), then you may choose a name for the Company ID (“Donated reagent from X Lab”) and use the RRID for the Catalog Number or some other unique identifier.
5. Create an Antibody Test record
Once the relevant Antibody records are in our listing, create the Antibody Test record:
-
From the navigation bar, click Internal > Antibodies > Antibody Validation.
The
Create Antibody Tests Recordform appears.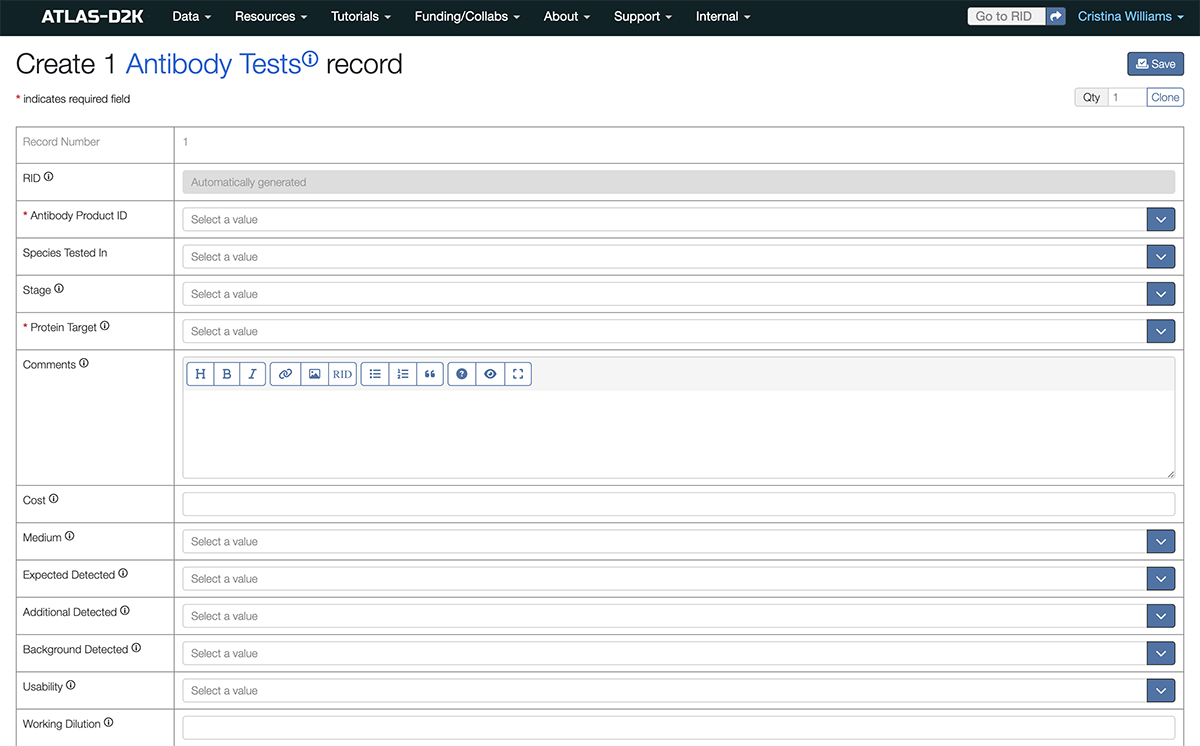
-
Select the values for each relevant field. See section 5.1 below.
-
Note: If you are creating multiple antibody test records, you may click the
Clonebutton (under theSavebutton) to copy over the record form. Each time you clickClonewill display a copy of the most recent form that you can edit as needed. You can also add a number to theQtyfield to clone more than one record at a time. -
When finished, click
Saveto save your new antibody test record(s).
5.1 Fields for Antibody Test record
| Field | Description | Required or Optional |
|---|---|---|
| Antibody Product ID | The product ID of the antibody used in this test. | Required |
| Species Tested In | The species of the organism used in this test. | Required |
| Stage | The developmental stage of the organism used in this test. | Optional |
| Protein Target | The protein targeted in this test. | Optional |
| Comments | Use this field to add any comments related to this test. | Optional |
| Cost | The cost of the antibody used in this test. | Optional |
| Medium | The slide preparation used (frozen or paraffin) in this test. | Optional |
| Expected Detected | Choose true if the expected antibody binding occurred in this test. | Optional |
| Additional Detected | Choose true if additional antibody binding occurred in this test. | Optional |
| Background Detected | Choose true if background antibody binding occurred in this test. | Optional |
| Usability | Specific detection of the target protein determined to be achieved. | Optional |
| Working Dilution | The antibody dilution used in this test. | Optional |
| Test Method | Choose the method used in this test. | Optional |
| Lower Titration Possible | Choose true if the antibody in this test might be usable at a lower concentration through titration. | Optional |
| Curation Status | Indicates if this record is still being worked on, is being reviewed, is embargoed until publication or has been released to the public. For a complete description of the curation process, see Curation Workflow | Required |
| Principal Investigator | Use the primary Principal Investigator for this collection of data. You may only indicate one PI. | Required |
| Consortium | Indicate the Consortium (GUDMAP or RBK). | Required |
Once you have saved the form, you will see a new Antibody Test record.
You can come back at any time and click “Edit” in the record header to modify this record.
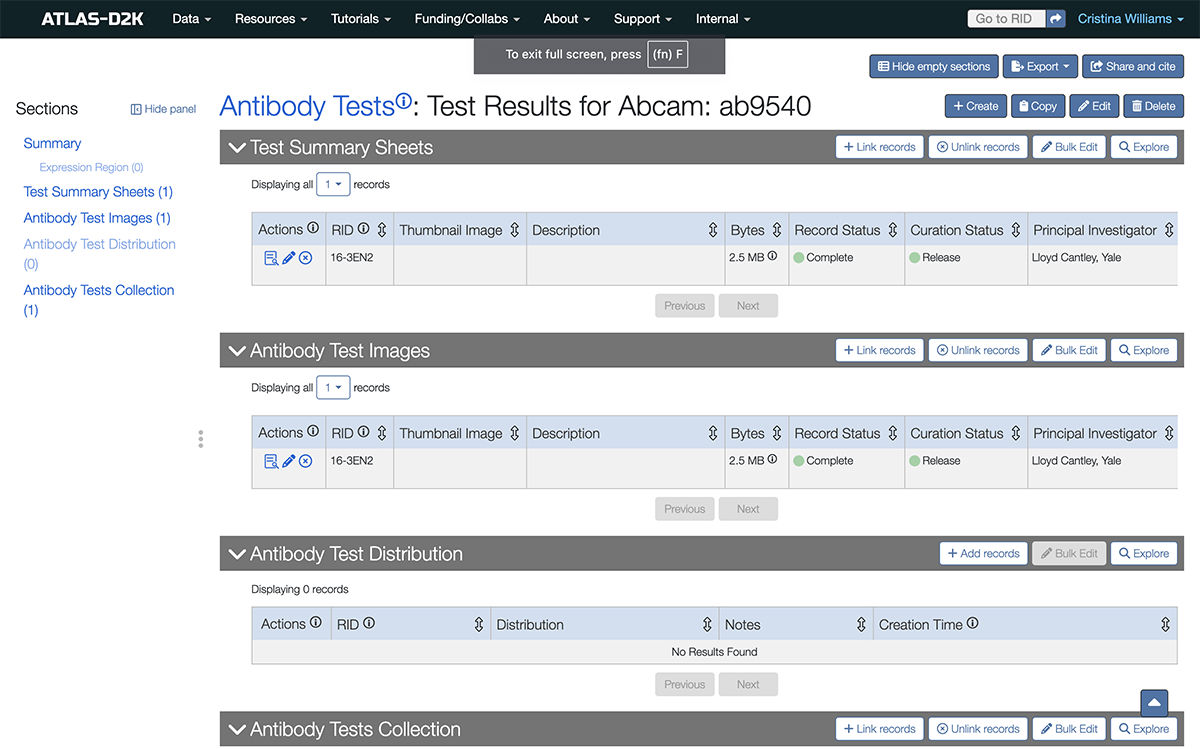
6. Add Test Summary Sheets and Antibody Test Images
On your new Antibody Test, there are sections labelled Test Summary Sheets for PDF summaries of the test, and Antibody Test Images for slide images relevant to the test.
To fill out these sections, you will link to Antibody Media images and upload your media:
-
Click
Link Records.This will bring up the
Link Antibody Media Files...window. -
If the desired file has previously been uploaded, search for and select it.
-
If not, upload your file by doing the following:
- Click the
Create newbutton towards the top-right of the window.
This will open the
Create Antibody Media Files Recordpage in a separate browser tab.
- Click on
Select Fileto select a file from your computer. (Either an image file if you’re adding a test image or a PDF for the test summary).
- Click the
6.1 Fields for Antibody Media File record
| Thumbnail Image | Choose a file TBD | Optional |
| File | Select the relevant media file. | Required |
| Media Type | Select type of media you are uploading (ie, PDF, JPG, etc). | Required |
| Description | For Test Summary Sheets, it would be helpful to paste in the summary of the test result doc from the PDF. | Optional |
| Curation Status | Indicates if this record is still being worked on, is being reviewed, is embargoed until publication or has been released to the public. For a complete description of the curation process, see Curation Workflow | Required |
| Principal Investigator | Use the primary Principal Investigator for this collection of data. You may only indicate one PI. | Required |
| Consortium | Indicate the Consortium (GUDMAP or RBK). | Required |
-
Click
Saveto complete the upload and save the media record. You may close this tab. -
Go back to the browser tab of your Antibody Test Record and select your newly-uploaded file from the
Choose Antibody Media Fileswindow. -
Click
Saveto link your image or PDF to the antibody test. Note: You may need to refresh the page to see the results.
7. Add Antibody Test Distribution terms
The Antibody Test Distribution section is where you will add cell types / anatomical regions relevant to this antibody test.
- Click
Add Records. This will bring up a “Create Antibody Test Distribution record” window. - Click the Distribution field. In the search field, and start typing the anatomical or cell type term to narrow your results.
- Click
Saveto add the distribution. - Repeat for as many distributions as needed.
If you cannot find the term you need, please contact help@atlas-d2k.org.
8. Reviewing and Submitting Antibody Data
-
Make sure you are logged in.
-
From the navigation bar, click Data > Antibodies > Antibody Validation.
-
In the faceting sidebar on the left, scroll to Principal Investigator and search for the project’s PI name. The newest records should appear at the top.
-
When your record is approved internally, change Curation Status to Submitted to send it to the Hub (click here for the full Curation Workflow).