Bulk Upload with DERIVA Client Tools
Our underlying software system, DERIVA, has client tools for authenticating (DERIVA-Auth) and performing a bulk upload of sequencing data files (DERIVA-Upload). This is recommended if you have a large or complex sequencing data submission.
There are two versions of the client tool:
- a graphical interface that can be run to upload files from your desktop system, and
- a command-line interface that can be used to upload files from a remote server.
Although the process for downloading and running the above tools are different, they both use the same directory structure designed for different data types. So make sure you’ve read the Organize files for bulk upload section first.
Note: Currently these instructions focus on uploading sequencing data. We will be adding the ability to upload specimen imaging data soon.
Overview of Bulk Upload Process
The following are the basic steps for using the client tools to upload data files.
- Overview of Bulk Upload Process
- 1. Join the correct group
- 2. Organize files for bulk upload
- 3. Download and install DERIVA Client
- 4. Using the GUI from a Desktop
- 5. Using the
deriva-upload-clicommand on a remote server
Here are the details for each step.
1. Join the correct group
Follow the instructions on this page. If you’re not sure which group you need to join, please contact help@atlas-d2k.org.
2. Organize files for bulk upload
The upload tools will use the names of the directories (i.e., folders) and files to determine what kind of files you are uploading and which metadata records to attach them to.
2.1. Supported file types
The following sequencing data file types are supported for uploading to the ATLAS-D2K repository:
| Extension | File Type | Description (will appear in file caption) | mandatory |
|---|---|---|---|
| R1.fastq.gz | FastQ | F reads | mandatory |
| R2.fastq.gz | FastQ | R reads | mandatory for Paired-End |
| bam | bam | alignment | mandatory |
| bed | bed | positive regions | optional |
| bw | bigWig | visualization track | optional |
| rpkm.txt | txt | expression value | optional |
| tpm.txt | txt | expression value | optional |
We will add supported file types for imaging data soon.
2.2. Set up the directories
The directory structure will use the “Internal ID” you chose for the Study and Experiments. Here’s an example of the required directory structure.
  $userid
    \- deriva
      \- Seq
        \- <Study Internal ID>
          \- <Experiment Internal ID>
where
derivais the name of our softwareSeqis a subfolder ofderiva. This indicates that everything within is sequencing data (e.g. non single-cell and single cell)<Study Internal ID>is the Internal ID specified in the Study metadata record (e.g.NPC_stability).<Experiment Internal ID>is Internal ID specified in the Experiment metadata record (e.g.mNPC_RNA).
2.3. Choose naming conventions for replicate-level files
Within each experiment directory, you will add the data files for the replicates for that experiment using one of two naming conventions.
Note: Remember we need a replicate for each unit of tissue used in an experiment. For example, three kidney biopsies from a single person would be three replicates from a single kidney of that person.
The two file naming conventions to choose from are:
<Biological Replicate Number>_<Technical Replicate Number>_<Custom Text>.R1.fastq.gz
Or
<Replicate RID>_<Custom Text>.R1.fastq.gz
As you can see, you can either use:
- A combination of
<Biological Replicate Number>with<Technical Replicate Number>(e.g.1_1). - Or the
<Replicate RID>which is the RID (Resource ID) of the replicate record (e.g.Q-Y500).
In either case, you can use custom text of your choice (e.g. sorted) after the numbering option to help distinguish the files for the user.
You can also use either file naming convention between different experiment directories in the same study.
Example 1:
If you have a study named “NPC_stability” with experiments named “mNPC_RNA” and “mNPC_ATAC”. you’d create two folders:
deriva/Seq/NPC_stability/mNPC_RNA- (on Windows the path would be
deriva\Seq\NPC_stability\mNPC_RNA)
- (on Windows the path would be
deriva/Seq/NPC_stability/mNPC_ATAC- (on Windows, the path would be
deriva\Seq\NPC_stability\mNPC_ATAC).
- (on Windows, the path would be
You would then place all your sequencing files into their respective experiment folders.
In the example below, we use the Biological Replicate Number and Technical Replicate Number convention to name the files in experiment “mNPC_RNA” and use the Replicate RID convention to name the files in the experiment “mNPC_ATAC”.
Both file naming conventions will be accepted by the client tool.
See actual examples of metadata and files in the NPC_stability Study.
$userid
  \- deriva
    \- Seq
      \- NPC_stability
        \- mNPC_ATAC
         \- Q-Y5CC_rep1
           \- rep1_seq_file.R1.fastq.gz
           \- rep1_seq_file.R2.fastq.gz
           \- rep1_seq_file_sorted.bed
           \- rep1_seq_file_normalized_profile.bw
           \- rep1_seq_file.kpm.txt
           \- ...
        \- mNPC_RNA
          \- 1_1_rep1
           \- rep1_seq_file.R1.fastq.gz
           \- rep1_seq_file.R2.fastq.gz
           \- rep1_seq_file_sorted.bed
           \- rep1_seq_file_normalized_profile.bw
           \- rep1_seq_file.kpm.txt
           \- ...
Example 2:
If you have a single-cell RNA study named “mouse_SC_RNASeq” with experiments “m1_e11_cortex” and “m2_p0_cortex”, you would create two folders:
deriva/scRNASeq/mouse_SC_RNASeq/m1_e11_cortex- (on Windows, the path would be
deriva\scRNASeq\mouse_SC_RNASeq\m1_e11_cortex)
- (on Windows, the path would be
deriva/scRNASeq/m2_p0_cortex- (on Windows, the path would be
deriva\scRNASeq\m2_p0_cortex).
- (on Windows, the path would be
You would place the sequencing files into their respective experiment folders.
In the example below, we use the Biological Replicate Number and Technical Replicate Number convention to name the files in experiment “m1e11_cortex” and use the Single Cell Metrics _RID convention to name the files in the experiment “m2_p0_cortex”.
Both file naming conventions will be accepted by the client tool.
See actual examples of metadata and files in the mouse_SC_RNASeq Study.
$userid
  \- deriva
    \- Seq
      \- mouse_SC_RNASeq
        \- m1_e11_cortex
         \- Q-Y4HM_rep1
           \- rep1_seq_file_R1_000.fastq.gz
           \- rep1_seq_file_R2_000.fastq.gz
           \- rep1_seq_file_sorted.bed
           \- rep1_seq_file_normalized_profile.bw
           \- rep1_seq_file.kpm.txt
           \- ...
         \- 1_1_rep1
           \- rep1_seq_file_R1_000.fastq.gz
           \- rep1_seq_file_R2_000.fastq.gz
           \- rep1_seq_file_sorted.bed
           \- rep1_seq_file_normalized_profile.bw
           \- rep1_seq_file.kpm.txt
           \- ...
2.4. Choose naming conventions for study-level files
If there are analysis files that are results of combining data from different experiments together, those files can be added to the Study Analysis File table. Follow the directory layout below to upload those files through the DERIVA client tools.
The layout of folders for analysis files to be linked at the Study level is:
$userid
  \- deriva
    \- Seq
      \- <Study Internal ID>
        \- <file 1>
        \- <file 2>
where:
derivais the name of our softwareSeqis a subfolder ofderiva. This indicates that everything within is sequencing data<Study Internal ID>is what is specified in the study metadata e.g.mouse_SC_RNASeq<file 1>,<file 2>are files that you want to uploaded so they can be linked to the study.
Example 3:
If there are analysis files that are the result of combining data from different experiments together, those files can be added as follows in the Study directory:
$userid
  \- deriva
    \- Seq
      \- mouse_SC_RNASeq
        \- analysis.xls
        \- cluster.html
3. Download and install DERIVA Client
DERIVA Client is a suite of tools that include DERIVA Upload and DERIVA Auth.
Download and install the latest version of DERIVA Client here. There are pre-packaged installers available for Mac or Windows desktops or you can install deriva-client from pip for Linux desktops or remote servers/clusters.
- DERIVA Upload - Allows you to choose a directory and upload all of the files within it.
- DERIVA Auth - Authenticates your submission if you are using DERIVA Upload on a remote server.
These are available both as GUI apps (for Windows or MacOS desktop) and command line utilities (for Linux desktops and remote servers/clusters).
You can find the GUI apps for Windows or MacOS in your Applications menu on Windows or MacOS under the “DERIVA Client Tools” folder.
4. Using the GUI from a Desktop
4.1. Launch and Configure DERIVA-Upload
Launch the DERIVA-Upload app (through the Applications menu for Windows or MacOS desktops) or run the deriva-upload command (for Linux desktops).
The first time you launch it, the tool will ask you if you want to add a server configuration.
-
Launch the Deriva Upload Utility through the applications menu on Windows or MacOS.
-
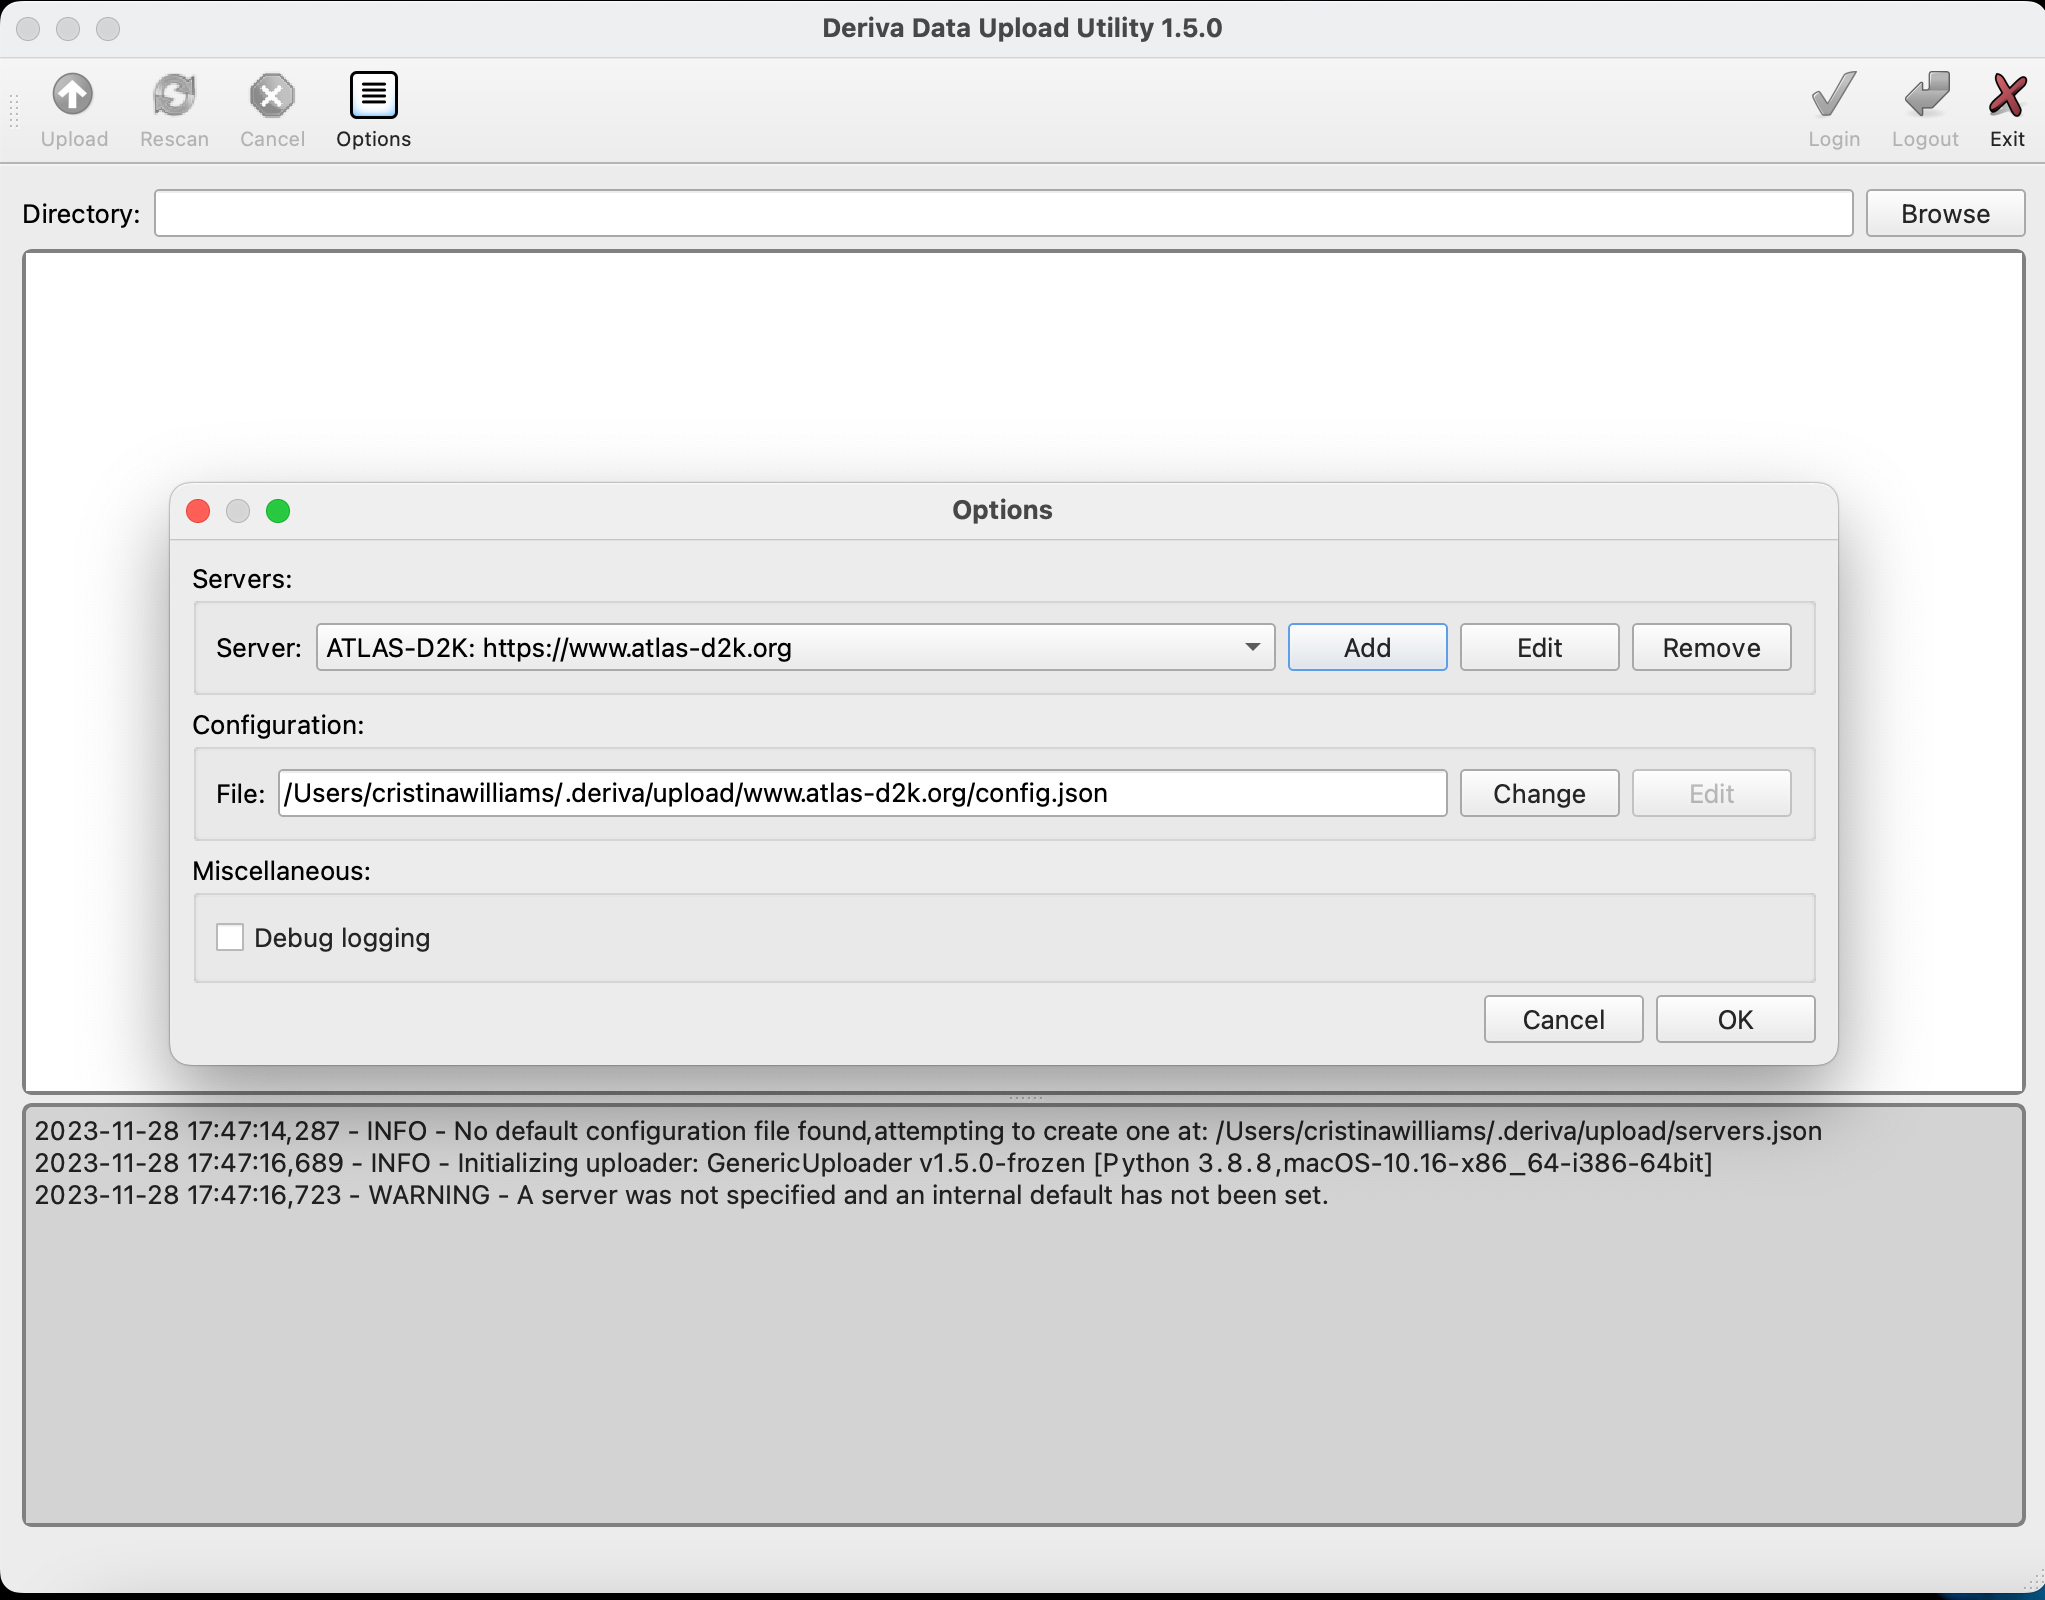
The tool will ask you if you want to add a server configuration. Click “yes” to bring up the “Options” screen (you can also do this at any time by clicking the “Options” button at the top of the page).
-
Click
Addto bring up the “Server Configuration” form and enter these values:Host: www.atlas-d2k.org Description: ATLAS-D2K Catalog ID: 2 -
Check the “Set as Default” and “Confirm configuration updates” fields, and click “OK”.
-
Then click “OK” again on the Options window.
4.2. Upload files
-
In the main DERIVA Upload window, click the “Login” button at the top to log in. This will pop up a login dialog window.
-
Once you’ve logged in, you may see a window notifying you that an updated configuration is available and asking if you’d like to apply it. Click “Yes” to update your configuration and dismiss the window.
-
In the main DERIVA-Upload window, click the “Browse” button.
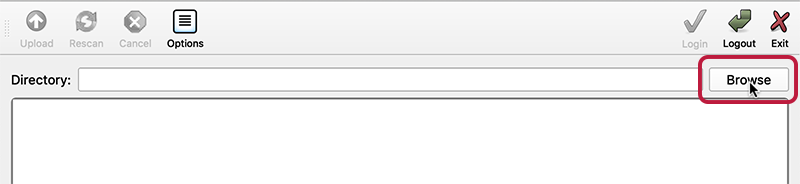
-
Select the
derivadirectory you created above. You’ll see all the files in your directory structure listed as “Pending”.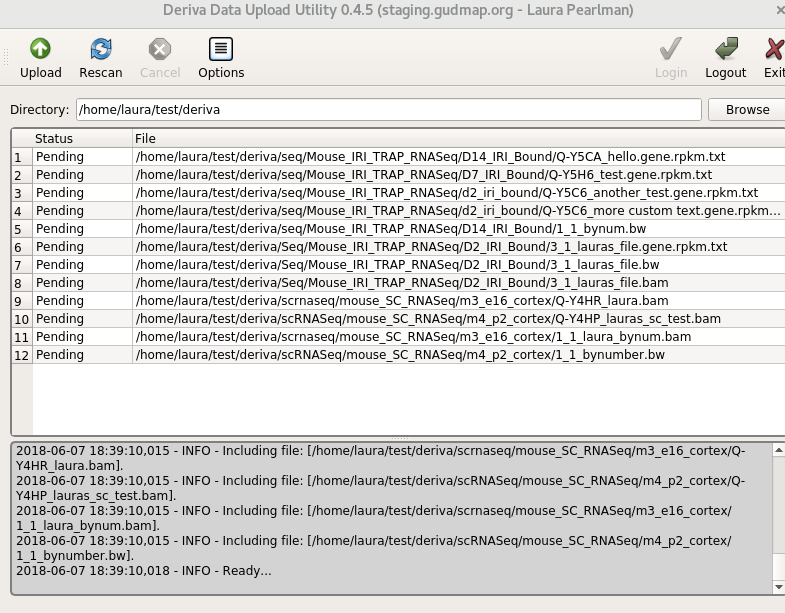
-
Click the “Upload” button to start the upload process. The status of each file will change as it is uploaded. For successful uploads, the status will change from “Pending” to “Complete”.
If for some reason, your upload is interrupted (ie, a network outage), DERIVA-Upload will re-try uploading a few times. If the upload is terminated, you can click the “Upload” button again and the system will automatically know which files were already uploaded successfully and skip them.
4.3. Log out
Authentication tokens expire after 30 minutes of inactivity but if you want to log out explicitly, click the “Logout” button at the top of the window.
5. Using the deriva-upload-cli command on a remote server
Using the command-line interface on a remote server is a bit more complicated. First, you’ll need to get an authentication token by running the DERIVA-Auth tool locally on your desktop. Then you’ll run the command-line tool on the remote server.
5.1. Get an authentication token from DERIVA Auth
The uploader requires an authentication token to communicate with the server. There are two options to authenticate to the server.
5.1.1. Authentication using GUI
-
Launch the DERIVA-Auth tool on your desktop (through the Applications menu on Windows or Mac, or with
deriva-authon Linux) to bring up an authentication window similar to the one used in the data browser. The first time you log in, you’ll see a mostly-empty window: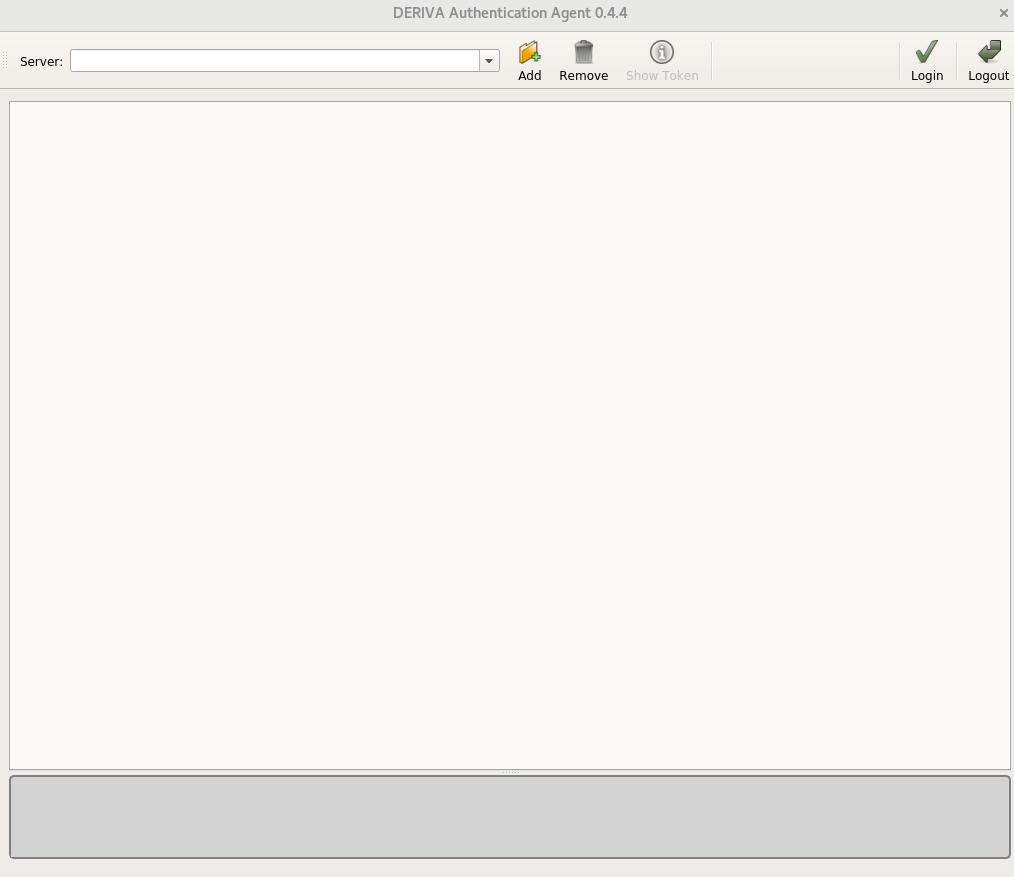
-
In the “Server:” area, type in the name of the target server (
www.atlas-d2k.org) and click onAdd. You should now see something that looks similar to the data browser login screen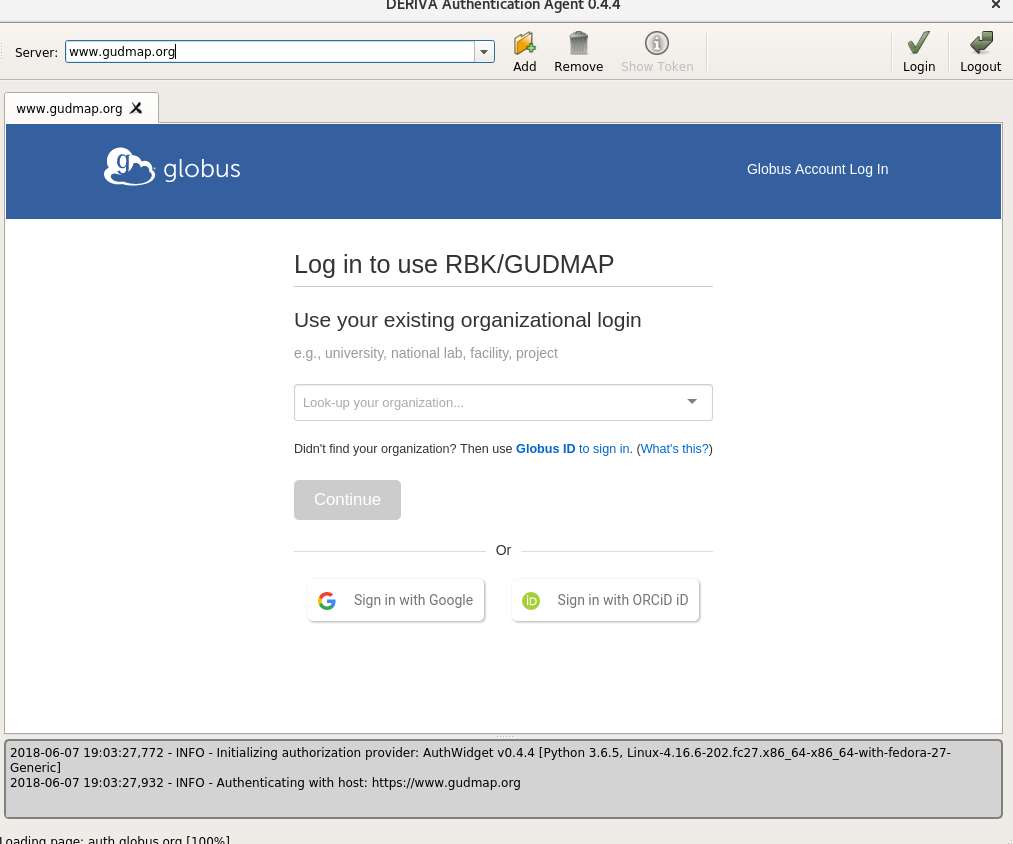
Note: In subsequent runs, DERIVA-Auth might take you directly to this window (skipping the blank screen at the beginning). It’s always a good idea to look at the server URL before you log in.
-
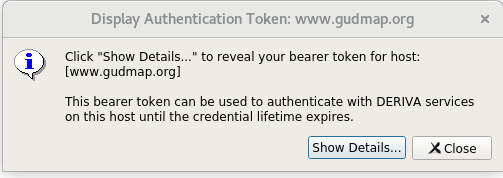
After logging in, you’ll see an “Authentication Successful” message. Click the “Show Token” button.
This will bring up another dialog box to verify that you really want to view the token. Click on “Show Details” to display the token. Copy and store for use in the upload command.
5.1.2. Authentication using CLI
On the client machine to be used for uploading the files, run the command:
deriva-globus-auth-utils login --host _host_ --refresh --no-browser
where:
- host is
www.atlas-d2k.org - –refresh indicates that the login session should be automatically refreshed. Without this flag, the session will expire after 24 hours.
- –no-browser is used when the upload activity is done on the server and there is no graphic interface support to launch the auentication UI. This parameter will provide a URL for user to cut and paste to their browser on a local machine to use for authentication. Upon a successful authentication, the user interface will display a token string that need to be pasted into the waiting prompt of this command.
For example:
# authentication with UI support
> deriva-globus-auth-utils login --host www.atlas-d2k.org  --refresh

# authentication without UI support
> deriva-globus-auth-utils login --host www.atlas-d2k.org  --refresh --no-browser
https://auth.globus.org/v2/oauth2/authorize?client_id=8ef15ba9-2b4a-469c-a163-7fd910c9d111&redirect_uri=https%3A%2F%2Fauth.globus.org%2Fv2%2Fweb%2Fauth-code&scope=urn%3Aglobus%3Aauth%3Ascope%3Agroups.api.globus.org%3Aview_my_groups_and_memberships+https%3A%2F%2Fauth.globus.org%2Fscopes%2Fstaging.atlas-d2k.org%2Fderiva_all+openid&state=_default&response_type=code&code_challenge=vxiCuV8LHysGxePaG7DFsOfKCFHUEYwPMRB9AaU2jTY&code_challenge_method=S256&access_type=online&prefill_named_grant=Login+from+deriva-client+on+ravine.lan+%5BLinux-6.8.9-100.fc38.x86_64-x86_64-with-glibc2.37%5D+to+hosts+%5Bstaging.atlas-d2k.org%5D+with+requested+scopes+%5Burn%3Aglobus%3Aauth%3Ascope%3Agroups.api.globus.org%3Aview_my_groups_and_memberships%2C+https%3A%2F%2Fauth.globus.org%2Fscopes%2Fstaging.atlas-d2k.org%2Fderiva_all%2C+openid%5D+
Please Paste your Auth Code Below: <PASTE THE TOKEN HERE>
5.2. Upload files with deriva-upload-cli
On the server, run the command:
> deriva-upload-cli --catalog 2 --token _token_ --catalog 2 _host_ _/path/to/_/deriva
where:
- token is the token copy-and-pasted from your DERIVA-Auth session
- host is
www.atlas-d2k.org, and - /path/to//deriva is the path to the
derivadirectory you created above.
For example:
> deriva-upload-cli --catalog 2 --token xXXxxxxXXxxxxXxXXXxXxxxX www.atlas-d2k.org $HOME/deriva
5.3 Log out
Authentication tokens expire after 30 minutes of activity but if you want to log out from DERIVA Auth explicitly, click the “Logout” button at the top of the window or logout through command line.
> deriva-globus-auth-utils logout