Register Human Adult Data with the Human Atlas Reference
This page includes directions to register human data with HuBMAP’s RUI tool integrated into ATLAS-D2K. The Registration User Interface (RUI) supports spatially registering human tissue blocks to a 3D reference organ in the HRA using the Common Coordinate Framework (CCF) Registration User Interface (RUI) from HuBMAP.
You can find the video tutorial for using this tool here.
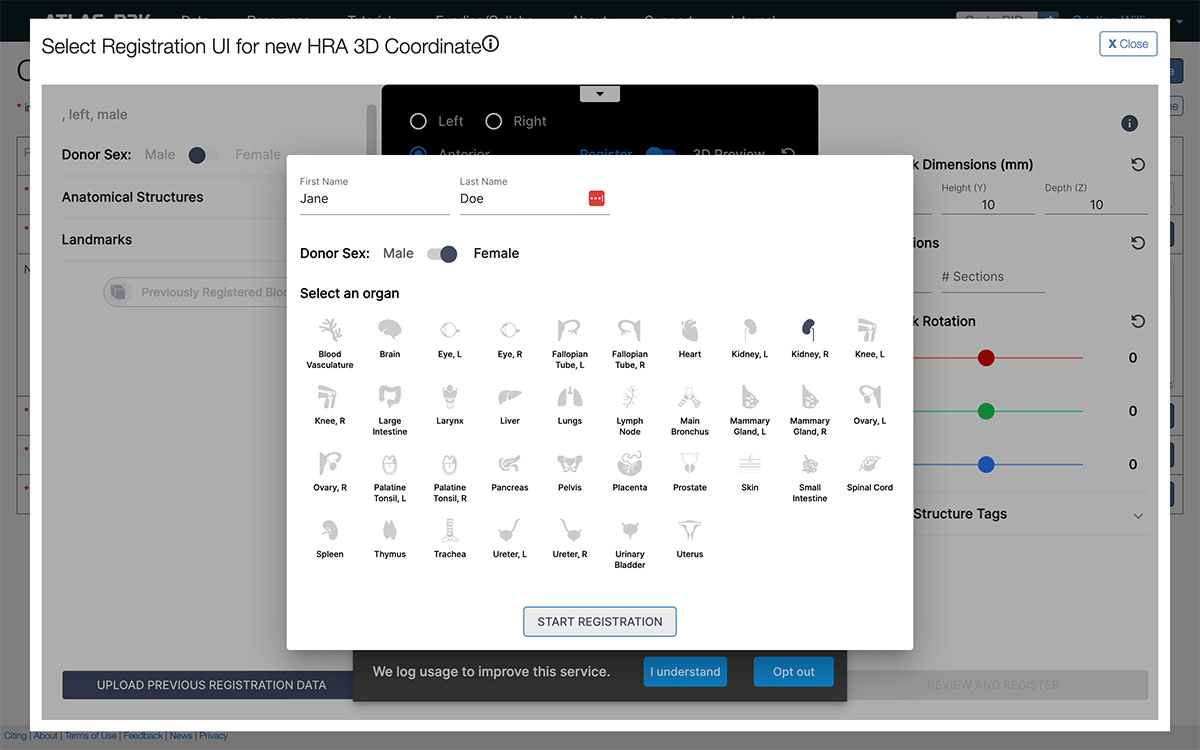 The “Start registration” page
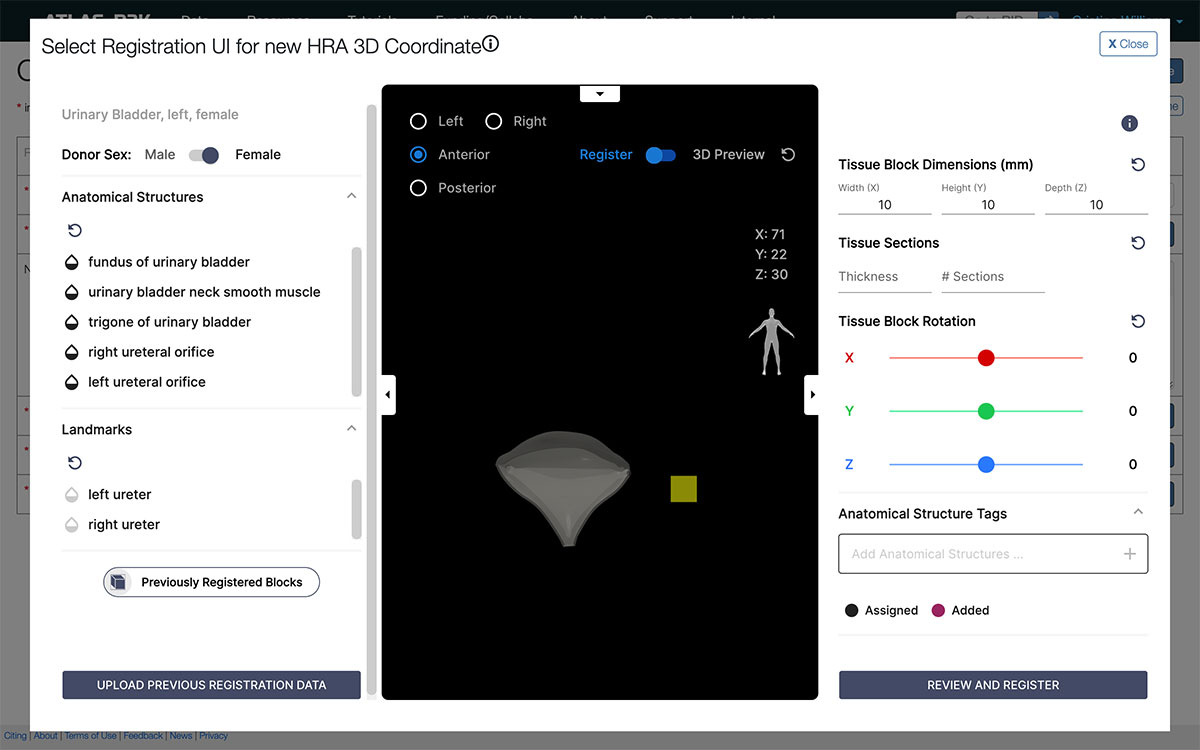 The main RUI registration interface
- With your Specimen record in edit mode, scroll down to find the HRA 3D Coordinate field and click “Select a value” to choose an “HRA 3D Coordinate”.
- Click the Create new button on the top right of the table.
- In the “Name” field, add a logical name for the coordinate.
- Click “Select a value” in the Registration UI field to open the CCF-RUI tool.
- Fill in the fields and click “Start Registration”.
- Enter the values in the RUI tool: set the Anatomical Structure, and indicate the location of the sample by dragging the square into the correct location of the organ. The RUI interface offers two ways of navigation: 2D (Register) and 3D (3D Preview):
- Under the 2D option, which is the default option named Register, you can switch between four different views of the organ (Left, Right, Anterior, Posterior) and use your mouse to drag and drop the virtual square to the correct location.
- Under the 3D Preview option, you can use your mouse to rotate the organ in three dimensions and use keyboard shortcuts to move the block (“W” and “S” for up-down, “D” and “A” for right-left, and “Q” and “E” for anterior-posterior).
Once you are finished, click “Review and Register” and then “Register”. This will close the popup and display the ID of your registry.
- After choosing the appropriate values for other fields, click the Save button. If there weren’t any errors, you will be redirected to the record page of the HRA 3D Coordinate you created.
- Find the Specimen form tab that you were working on. Upon focusing on the page, the displayed option on the popup should update so you can see the newly created record.
- Click the “Select” button (the blue button with the checkmark icon) on the row corresponding to the newly created HRA 3D Coordinate. The popup should close, and you should see the name of your registry on the HRA 3D Coordinate field.
You can now click on the Save button to save your changes. If there weren’t any errors, you will be redirected to the record page of the Specimen.
6.1 Editing an existing HRA 3D coordinate
- Go to the Specimen page and make sure you are logged in.
- From the “Refine search” sidebar, find the “HRA 3D Coordinate” filter and open it (it’s the second to last option).
- Choose the “All records with value” option. The results table will now only display Specimen records that include HRA 3D Coordinate data.
- You can choose a specific coordinate you want to edit instead of “All records with value”.
- Open any Specimen records by clicking on the “View” icon (document with magnifying glass icon).
- In the opened Specimen record page, you should see the “HRA 3D Coordinate” field. Click on the field value, which is a link to the HRA 3D Coordinate record.
- In the opened HRA 3D Coordinate record page, use the Edit button to navigate to the edit mode.