Submitting Specimen Data
This guide will walk you through the steps to submit biospecimen and imaging data to the ATLAS-D2K Data Explorer. If you have any queries, please reach out to help@atlas-d2k.org.
Table of Contents
- Metadata Model for Specimen Records
- 1. Joining the Globus Group
- 2. What is a Specimen Record?
- 3. Submit Metadata Fields
- 4. Link to Anatomy or Cell Type Terms
- 5. Link to a Publication
- 6. Upload Image Files
- 7. Upload Video Files
- 8. Adding a new Human Reference Atlas (HRA) 3D coordinate (Human Adult Data Only)
- 9. Add Antibodies, Probes, Gene Expression Scores
- 10. Other Information
- 11. Documenting Stages for Human Organoids
- 12. Finalizing Your Submission
Follow the steps outlined to enhance the discoverability of your specimen and data. The more details you provide, the easier it is for users to discover your data.
Metadata Model for Specimen Records
1. Joining the Globus Group
To get editing access, join the relevant Globus group. Email help@atlas-d2k.org for assistance. For detailed information, see Accessing ATLAS-D2K Resources.
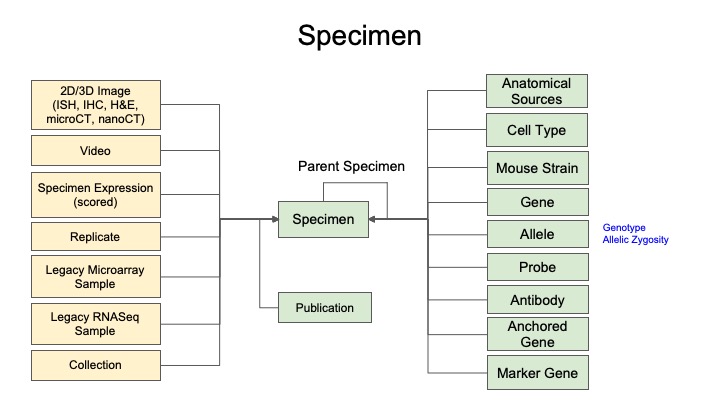
2. What is a Specimen Record?
A Specimen record describes the tissue from an organism (e.g., human, mice, organoid) used in your experiments. In ATLAS-D2K, these records host your imaging data and are linked to related sequencing studies.
Specimen records also house information such as antibodies that were used, expression scores and probes (among others).
2.1 Overview for completing a Specimen record
-
Submit metadata. When you first create a Specimen record, you will fill out a form to submit metadata about the bio-tissue used in your experiment(s).
-
Link to ontologies. From the newly created Specimen record, you will link to an anatomy ontology term via the Anatomical Source field. Depending on the data, you may also link to a cell type ontology via the Specimen Cell Type field.
-
Add image files. This is when you upload your 2D and/or 3D image files (we also accept videos).
-
Add image channels. If your images have multiple channels, you can describe them with Image Channels.
-
Add/Link to Antibodies, Probes, Gene Expression Scores. Depending on your experiments, you may also provide further information in these sections.
2.2 Organizing Specimen records (Parent/Child)
Many times, you will need to represent your Specimen records as a hierarchy, using Parent-Child relationships (sometimes Grandparent-Parent-Grandchild relationship). You may work with the Hub (help@atlas-d2k.org) directly to determine if you need such a hierarchy and how best to organize it.
The purpose of Specimen records and using a hierarchy is to make sure that in downstream analysis, it is always clear exactly which tissue (Specimen) was used to generate data.
An example of such a hierarchy is if an original tissue sample (Specimen A) is dissected into different samples for an experiment. Let’s say there are two of these samples, one for Histology imaging (Specimen B) and one for a Sequencing assay (Specimen C). In this case, you would first create a Specimen record for the original tissue (Specimen A) and this would be considered the Parent Specimen. Then Samples B and C would be Child Specimen records. These relationships are determined by the “Parent Specimen” field in the Specimen metadata (see section 3.1 below).
[TODO: ADD GRAPHIC HERE]
3. Submit Metadata Fields
- Use this link to log in and create a Specimen. Alternatively, from atlas-d2k.org,:
- In the top-level menu, click Internal, then Specimen.
- From a Specimen page, you can also click the
Createbutton (you must be logged in to see this button).
-
At a minimum, fill out the essential fields marked with a red asterisk (*). However, filling out more fields enhances data discoverability.
- Upon completion, click
Save.
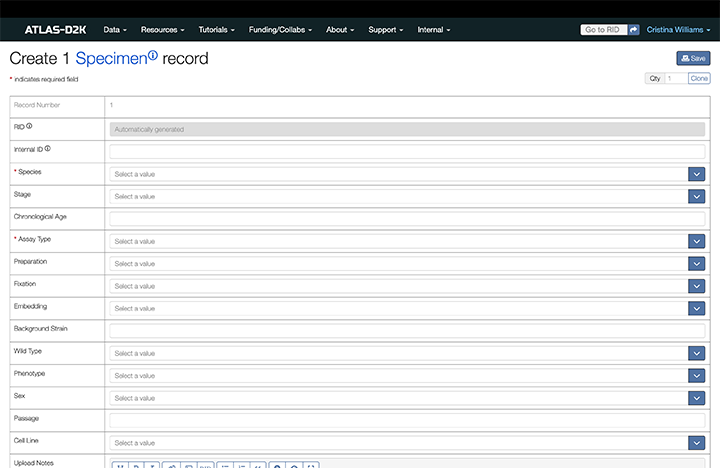
3.1. Fields for Specimen Records
| Field | Description | Required/Optional |
|---|---|---|
| Internal ID | An important field for your own lab’s tracking purposes. This can be very useful to help you search for your Specimen records later and is critical if using the DERIVA client tools to bulk upload. | Optional (but highly recommended) |
| Species | e.g., Homo sapiens, Mus musculus. | Required |
| Stage | The Theiler or Carnegie stage. If you cannot provide the stage, there is also the Chronological Age field where you can type in the age using free text. | Optional |
| Chronological Age | Free text field where you can manually enter the age of the specimen. | Optional |
| Assay type | The imaging related types are IHC, ISH, and Histology. | Required |
| Preparation, Fixation and Embedding | These fields describe how the sample was prepared. | Required |
| Background Strain, Wild Type, Phenotype, Sex, Passage, Cell Line | If available, provide further information about the specimen. | Optional |
| Upload Notes, Probe Usage Notes, Experiment Notes and Results | These fields are open text, Markdown-formatted text boxes and provide an opportunity to provide more context about the data. | Optional |
| Acknowledgements | Use this file to record people involved in processing this specimen for the experiment. | Optional |
| Parent Specimen | If you have subdivided a biological sample (e.g., you created sections from a sample), you can create a Specimen record for the original sample. Then for each section (child), designate the original sample as the "parent". You can continue doing this to show different levels of grandparent/parent/child relationships. | Optional |
| Representative Image | This is an optional thumbnail of the image. If you do not add one, the system will automatically select the thumbnail from the first image record. Read this doc for our thumbnail guidelines. | Optional |
| HRA 3D Coordinate | If the specimen is human, please register with the Human Reference Atlas Portal. Instructions are available in Section. 5 below. [ADD LINK] | Optional |
| Curation Status | The default value is In Preparation which means this record is in draft mode and will only be viewable by other Consortium members who are logged in. For more information, see Curation Workflow. | Required |
| Principal Investigator | Choose the appropriate Principal Investigator. If your PI is not on the list, click the plus sign just to the top right of the list to create a new record for them. | Required |
| Consortium | Select GUDMAP or RBK. | Required |
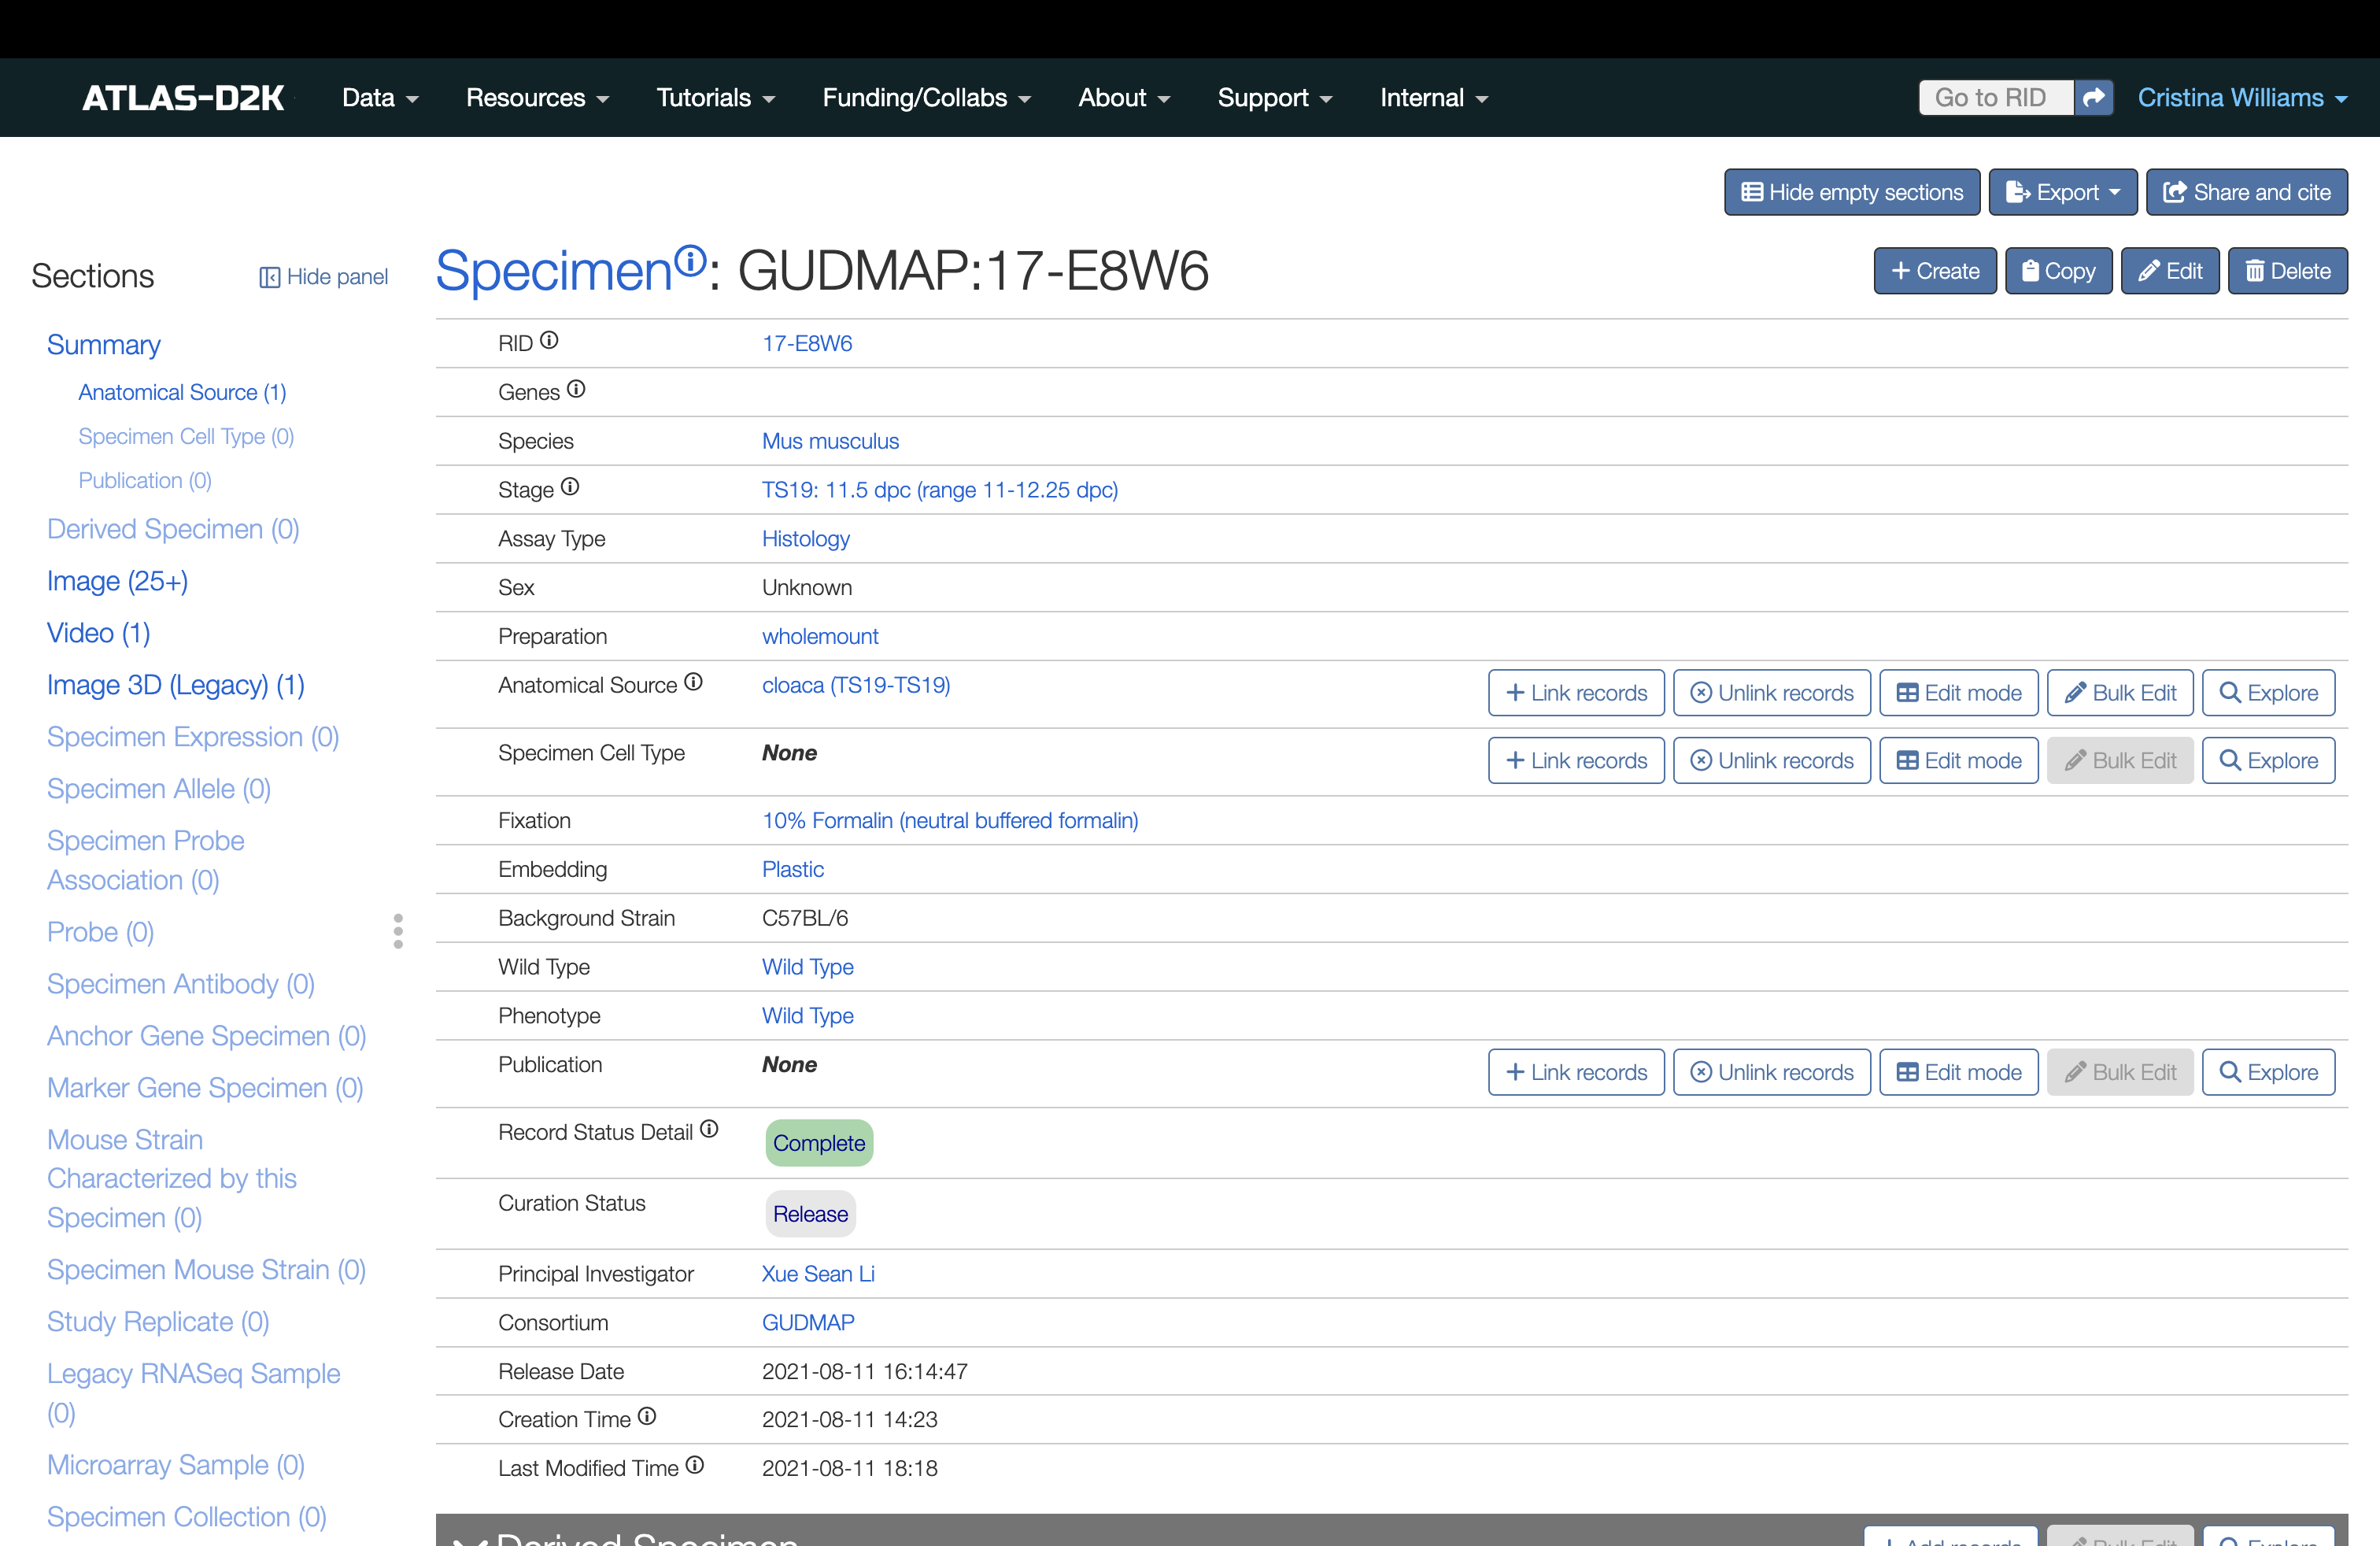
Once you have saved the form, you will see a new Specimen record much like the following example:
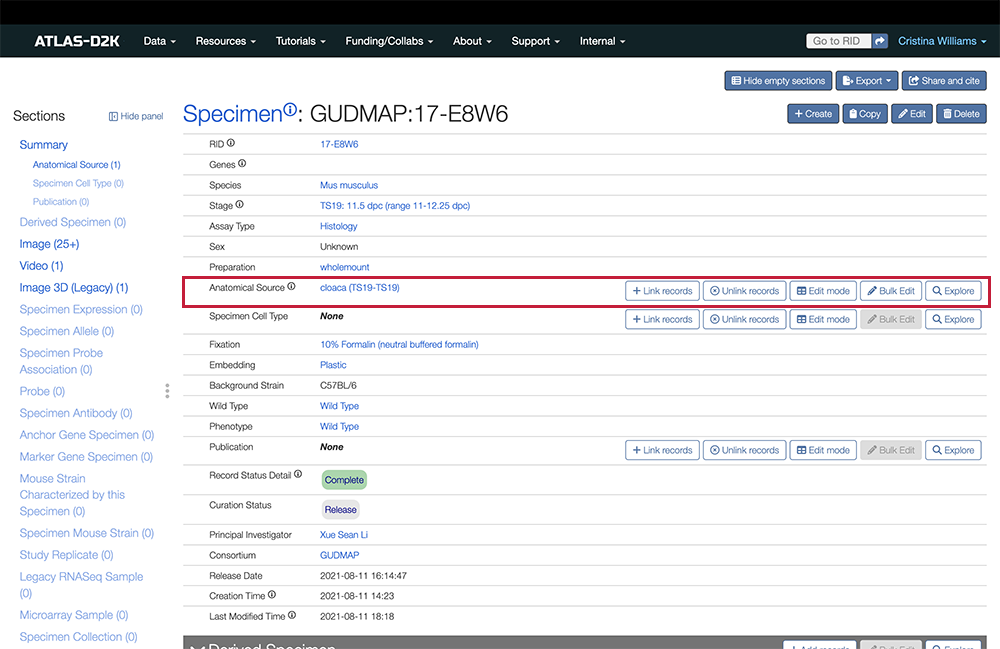
4. Link to Anatomy or Cell Type Terms
From the Specimen record, link to at least one Anatomical Source from our list of ontology terms (from GUDMAP EMAPA or UBERON). This is required.
In the Sections list (left sidebar), look for the Anatomical Source and click the link. The field will scroll to the top of the page.
To the right of the field, click the Link record button. Start typing a term and choose your term from the list of available ontological terms.
-
To indicate stem cell lines, search for “iPSC” or “hiPSC”.
-
You may enter more than one anatomical source, for example, if you entered iPSC or hiPSC, add another anatomical source and search for “podocyte”, “kidney organoid”, etc.
- To enter the cell line, click
Editfor the Specimen record, scroll down to the Cell Line field and click the dropdown field to show available lines. Search for the cell line. If it is not available, you can clickCreate new, fill in the form and clickSaveto add it to the list.
If your data is at the cell level, link at least one Specimen Cell Type from the Cell Ontology. Note that this is a newer field. If you do not see the cell type terms you need, please contact help@atlas-d2k.org.
4.1. To Add the Same Anatomical Source to Several Specimen Records
This shortcut is handy if many Specimen records require the same Anatomical Source.
-
Navigate to Anatomy Facet Search.
-
Find the required anatomical term and click the
View Detailsicon to open the page. -
Scroll down to the Specimen section and click
Link recordsto link multiple Specimen records.
5. Link to a Publication
From the Specimen record, link to the related publication. In the Sections list (left sidebar), look for Publication and click the link. To the right of the field, click the Link records button.
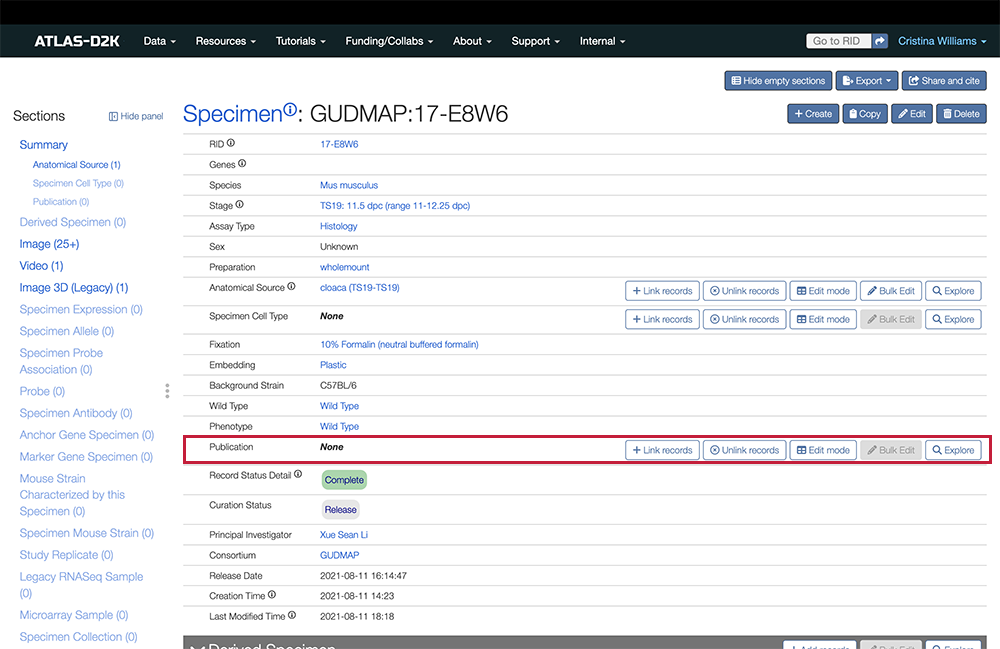
If you know your publication has already been entered, search for the title and then click to link to the publication.
Otherwise, click the Create new button and fill out the fields with information about the publication. Click Save when you are finished.
5.1 Fields for Publication Records:
| Field | Description | Required/Optional |
|---|---|---|
| Title | Title of the publication | Required |
| Authors list | List of authors, as they appear in the publication. | Optional |
| Abstract | Abstract of the publication | Optional |
| Publication venue | Name of the journal or publication venue. If this is not available, you may click Create new to add an entry for the venue. |
Required |
| Month | Publication month | Optional |
| Year | Publication year. | Required |
| Volume | Journal volume. | Optional |
| Issue | Journal issue. | Optional |
| Pages | The pages where the publication appears. | Optional |
| PubMed ID | The PubMed ID of the publication. | Optional |
| DOI | The DOI reference. | Optional |
| URI | Link from which the publication may be downloaded. | Optional |
| Publisher Item Identifier | A unique identifier, used by scientific journal publishers, to identify documents. | Optional |
| File URL | Use this field to upload a PDF of the publication. | Optional |
| Curation Status | Keep the default value of Submitted. | Required |
| Principal Investigator | The lead principal investigator of the publication. | Required |
| Consortium | Indicate GUDMAP or RBK. | Required |
6. Upload Image Files
You can upload 2D images and 3D images. Check the accepted image file formats on this page.
-
Go to the Image section.
-
Click the
Add recordsbutton to the right of the section. -
Fill out the fields and then click
Save.
We highly recommend uploading a thumbnail file for the Image records. Read this doc for our thumbnail guidelines..
Note: 3D image files were previously uploaded in a separate section. Those files are still avaiable in the section labeled Image 3D (Legacy).
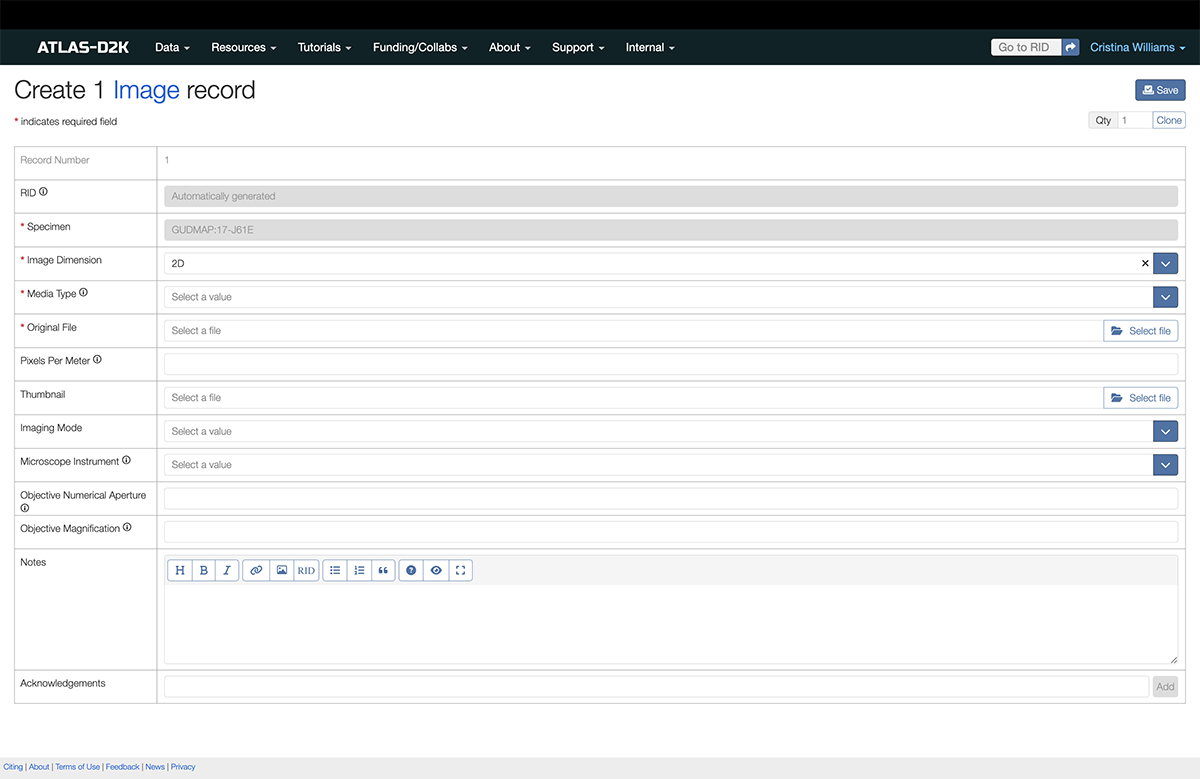
6.1. Fields for Image Records
Although there are few required fields, the more fields you fill out, the more FAIR (findable, accessible, interoperable and reproducible) your data will be. Many of these fields will be especially helpful for the processing of lightsheet and other 3D imaging data in future pipelines.
| Field | Description | Required/Optional |
|---|---|---|
| Image Dimension | Choose 2D or 3D. | Required |
| Media Type | Select the format of the file. If a type is missing, please contact help@atlas-d2k.org. | Required |
| Original File | Use this field to select your file locally. If you have many files, they are especially large (> then 10GB) or are only accessible remotely, use see "Batch Upload Image Records" below) | Required |
| Pixels per Meter | Number of pixels per meter associated with the image. This data represents pixel to physical scaling information. | Only supply this if the uploaded image file does not contain this metadata. |
| Thumbnail | Use this field to upload a small represenative image (for the search results). Please read our brief guidelines for thumbnails here. | Optional |
| Imaging Mode | Indicate how the mode used when the image was captured. | Optional |
| Microscope Instrument | Name of the microscope used to capture the image. If your microscope is not listed, click the `Create new` button to add the name. | Optional |
| Objective Numerical Aperture | Lens numerical aperture (e.g., 0.156) | Optional |
| Objective Magnification | Lens magnification (e.g., 2x) | Optional |
| Notes | Use this field to add any clarification or description that may be useful to users. | Optional |
| Acknowledgements | Add the name and role of people who captured this data. | Optional |
6.2. Uploading Several Images
6.2.1. Clone Records
If you need to upload multiple image records simultaneously through the web interface, use the Clone button:
- Fill in the values of the field in the form that will be common across multiple records.
- Click the
Clonebutton to create additional forms and edit individual ones as needed.
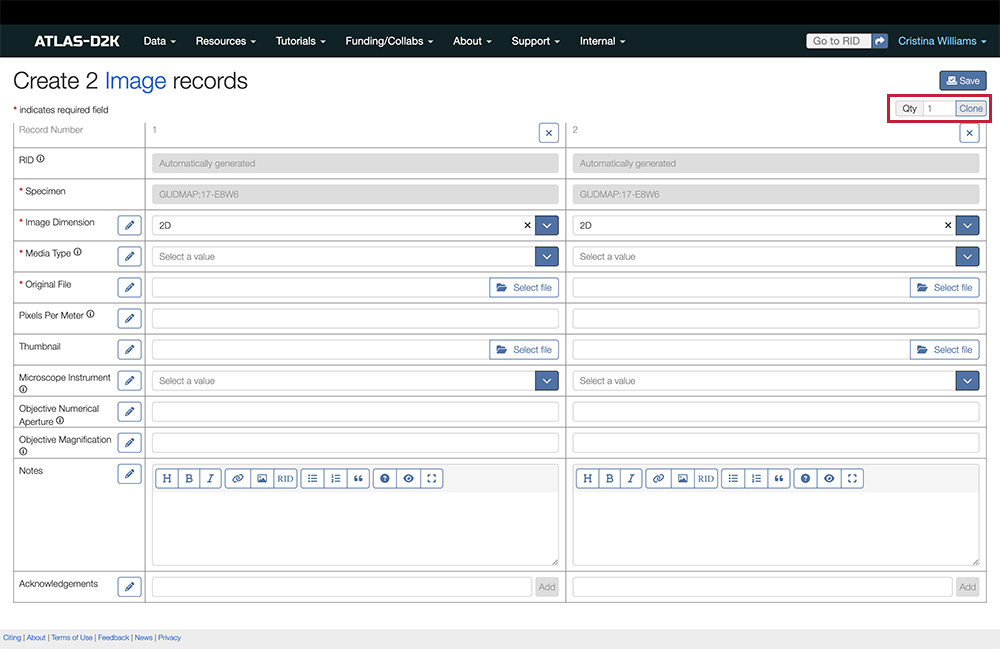
6.2.2. Use DERIVA Client Tools
If you have many files or your files are very large (over 5GB), then you may need to use our client tools for uploading files programmatically. See Bulk Uploading Image Files for more details.
6.3 Add Image Channels
For imaging data with multiple channels, you can designate their colors via the Image Channel field on the Image record. Historically, this information was entered in the free text Notes field and that is also an option.
To add Image Channels:
-
On the Image record you just created, scroll down to the Image Channel field and click the
Add recordsbutton for each channel you want to add. -
Fill out the fields and click
Savewhen finished.
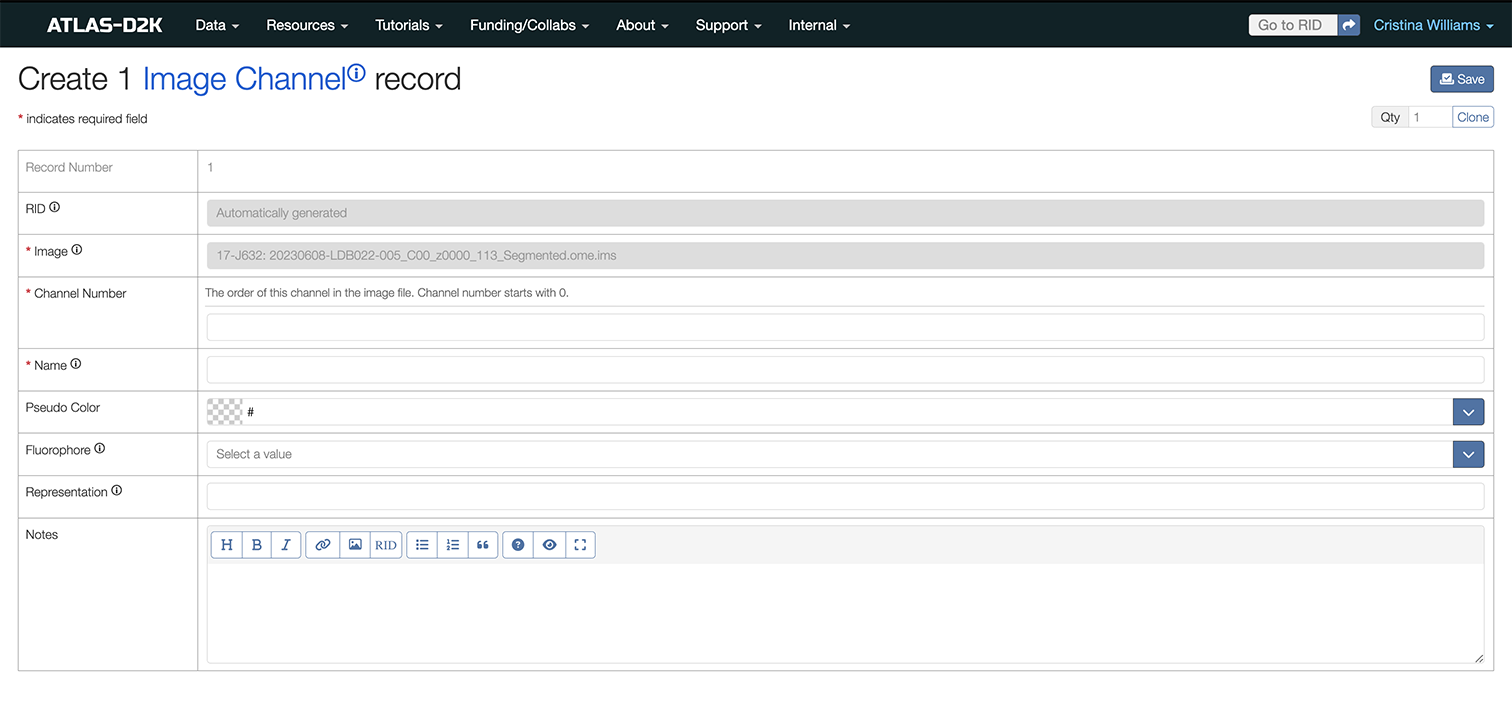
6.3.1 Fields for Image Channels
| Field | Description | Required/Optional |
|---|---|---|
| Image | This should already be set to the related Image record associated with this channel. | Required |
| Channel Number | Use this field to enter a number that indicates the order of this channel in the image file. Channel number starts with 0. | Required |
| Name | Provide a name for the Image Channel. The name should reflect what is displayed on the channel (gene, protein, antibody, etc.) | Required |
| Pseudo Color | The hexadecimal code for the channel color. You may either enter the code in the field or click the down arrow to use a color picker. | Optional |
| Fluorophore | Choose the fluorophore used in the channel. If the one you want is not listed, click the `Create new` button to add it. | Optional |
| Representation | Use this plain text field to indicate what this channel represents (e.g., rhodopsin, virus). | Optional |
| Notes | This is a Markdown-formatted text field available for any additional information you want to provide. | Optional |
7. Upload Video Files
You can also upload videos. Use these links to learn the accepted video file formats and video platforms.
-
Go to the Video section.
-
Click the
Add recordsbutton to the right of the section. -
Fill out the fields and then click
Save.
7.1. Field Descriptions for Video records
| Field | Description | Required/Optional |
|---|---|---|
| Title | Provide the title describing the video. | Required |
| File URL | Use this field to select your file locally. | Required |
| Media Type | Select the format of the file. If a type is missing, please contact help@atlas-d2k.org. | Required |
| Data Provider | This is your lab's institution. If you need to add an institution, please contact help@atlas-d2k.org. | Required |
8. Adding a new Human Reference Atlas (HRA) 3D coordinate (Human Adult Data Only)
If your Specimen record is for human adult data, please follow the instructions on this page to register it with HuBMAP’s Human Atlas Reference using their Registration User Interface (RUI) tool (which has been integrated into the ATLAS-D2K system as of 2024).
9. Add Antibodies, Probes, Gene Expression Scores
There are many other types of information that you can connect with your Specimen record. In general, the process is the same:
-
Go to the desired section.
-
Click
Add record. -
Fill out the form fields and then click
Savewhen you are finished.
The following tables guide you to details on the more common types of information to enhance your Specimen data. You can find field descriptions for each of these in the following sections:
| If… | Add records to these sections: |
|---|---|
| the slide was stained with an antibody | Specimen Antibody |
| you are associating probes to genes | Specimen Probe Association Note: The Probe section will display details of the probe(s) you chose - you do not manually add any records to this section. |
| you are submitting In Situ Hybridization (ISH) data | Specimen Expression |
9.1 Fields for Specimen Antibody records
| Field | Description | Required/Optional |
|---|---|---|
| Antibody RID | Choose from the list of existing companies in our Antibody Listings. If you do not see the antibody company listed, click the Create New button to add it. | Required |
| Dilution | Optional | |
| Detection Method | Optional | |
| Lab ID | Common name provided by the contributing lab (e.g., anti-Calb1) | Optional |
| Detection Notes | Optional | |
| Secondary Antibody | Optional |
9.2 Fields for Specimen Probe Association records
| Field | Description | Required/Optional |
|---|---|---|
| Probe RID | Choose from the list of existing probes. If you do not see the probe listed, click the Create New button to add it. | Required |
| Strain | Optional | |
| Clone Name | Optional | |
| Tissue | Optional | |
| Product Label | Optional | |
| Final Label | Optional | |
| Probe Type | Optional | |
| Probe Origin Type | Optional | |
| Probe Stage Format | Optional | |
| Probe Stage | Optional | |
| Curation Status | The default value is In Preparation which means this record is in draft mode and will only be viewable by other Consortium members who are logged in. For more information, see Curation Workflow). | Required |
9.3 Fields for Specimen Expression records
For In Situ Hybridization (ISH) data, make sure to add scored expression regions in this section.
| Field | Description | Required/Optional |
|---|---|---|
| Expression Region | Indicate the anatomical region by searching through ontology terms. | Required |
| Strength | Select a value to indicate the strength of expression in that region. Choose from uncertain, present, and not detected. | Required |
| Strength Modifier | Optional | |
| Pattern | Optional | |
| Pattern Location | Optional | |
| Density | Optional | |
| Density Change | Optional | |
| Density Magnitude | Optional | |
| Density Relative To | Optional | |
| Density Note | Optional |
10. Other Information
The following are additional types of information that may be added to a Specimen record:
| Section | Description |
|---|---|
| Derived Specimen | If there is a Parent Specimen, it will be listed here (or is it the other way around, this is where Child Specimen would appear?) |
| Specimen Allele | |
| Probe | Lists any probes that were linked under Specimen Probes. |
| Anchor Gene Specimen | |
| Marker Gene Specimen | |
| Mouse Strain Characterized by this Specimen | |
| Specimen Mouse Strain | Lists any mouse strains that were characterized using the previous section (?) |
| Study Replicate | Links to any sequencing data related to this Specimen via the Replicate records in a Study. |
| Legacy RNASeq Sample | |
| Microarray Sample | |
| Specimen Collection | Links to any Data Collections that link to this Specimen. |
11. Documenting Stages for Human Organoids
Documenting the organoid development stages ensures data uniformity and comprehension.
Kidney organoids are derived from pluripotent stems cells (ESC or iPSC) using a variety of possible protocols. To help standardize assignment of stages of organoid development, we will adopt the convention found in the published literature. This defines the onset of induction as Day 0.
- Day 0 = Induction of iPSCs or ESCs to begin differentiation (i.e. CHIR99021 added)
Each protocol may vary in the rate of formation subsequent to induction, thus the protocol used for a given experiment must be clearly documented with an entered specimen. This can be a reference to a protocol in the GUDMAP database, or the published paper that details the approach (include PMCID/PMID number).
REFERENCES:
Takasato M, Er PX, Chiu HS, Maier B, Baillie GJ, Ferguson C, Parton RG, Wolvetang EJ, Roost MS, Chuva de Sousa Lopes SM, Little MH, 2015. Kidney organoids from human iPS cells contain multiple lineages and model human nephrogenesis. Nature 526, 564–568. PMID: 26444236
Morizane R, Lam AQ, Freedman BS, Kishi S, Valerius MT, Bonventre JV, 2015. Nephron organoids derived from human pluripotent stem cells model kidney development and injury. Nat Biotechnol 33, 1193–1200. PMCID: PMC4747858
12. Finalizing Your Submission
Once you are finished with your internal review, submit your records to the Hub by editing the Specimen record and change the Curation Status field to Submitted. Send email to help@atlas-d2k.org to let them know of the status change.
The Biocurator will review your submission and may have more questions for improving the quality of your submission.
Once the Biocurator and submitter are satisfied that the data is complete, the Biocurator will change the Curation Status field to Release, at which time it becomes publicly accessible.