Adding Specimen Records From a File (Draft)
This is draft content. Contact help@atlas-d2k.org to submit corrections or ask questions.
If you’re not familiar with the process of submitting Specimen records, please see our Submitting Specimen Data page (and/or the tutorial slides linked there) for an overview. The easiest way to create Specimen records is through the web interface, as described in that wiki page and tutorial. However, if you have a large number of specimens to enter, you might find it more convenient to upload a CSV file instead. This is just a replacement for step 2 of “Submitting Specimen Data”; you’ll still need to add anatomy and any relevant antibodies, probes, etc., as described on that page.
Step 1: create the spreadsheet.
First, download this template.
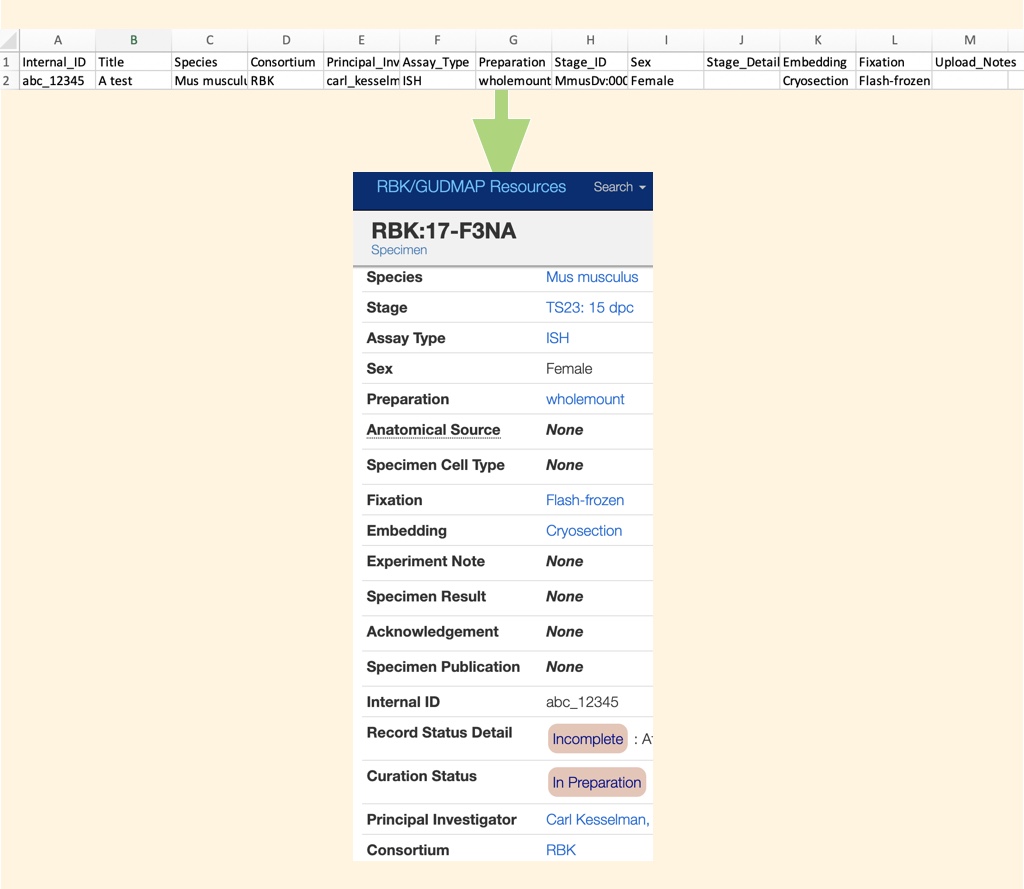
This spreadsheet has multiple tabs. The only one you need to fill out is the first one, labelled Specimen_simple (the other tabs provide values for drop-down menus that appear in the main tab).
Important: do not change any column headings or add or delete any columns. Fill in the spreadsheet as follows:
- Internal_ID - required. This should be a short unique identifier that’s meaningful to you. The Internal_ID is used to link metadata records (like the Specimen records you’re creating) with associated files (like any images you might upload later).
- Title - required. This should be a meaningful title that describes the specimen.
- Species - required. The species this specimen is derived from. Choose a value from the drop-down menu.
- Consortium - the consortium that funded the research associated with this specimen. Choose a value from the drop-down menu.
- Principal_Investigator - required. The PI responsible for this data. Choose a value from the drop-down menu (hint: you can remove choices from this drop-down by deleting rows from the “PI Values” tab).
- Assay_Type - required. Choose a value from the drop-down menu.
- Preparation - required for image data. Choose a value from the drop-down menu.
- Stage_ID - recommended. This is the developmental stage (Theiler stage, Carnegie stage, etc.). This one is a little tricky; you’ll need to find the appropriate stage in the “Stage_ID values” tab, remember the code from the last column, and then select that value from the drop-down menu back in the main tab).
- Sex - recommended. Select a value from the drop-down menu
- Stage_Detail - this is the chronological age.
- Embedding - required for image data. Select a value from the drop-down menu
- Fixation - required for image data. Select a value from the drop-down menu
- Upload_Notes - optional. Enter any free-form notes here.
Step 2: Create the CSV file, and put it where the DERIVA upload client can find it
After you’ve saved your spreadsheet as an xlsx file, save another copy as CSV (that’s plain CSV, not UTF-8 CSV). In order for the upload tool to find it, you’ll need to create:
- A folder called
deriva.- Within
deriva, a folder calledrecords- Within
records, a folder calledGene_Expression- Within
Gene_Expression, your CSV file, namedSpecimen_simple.csv.
- Within
- Within
- Within
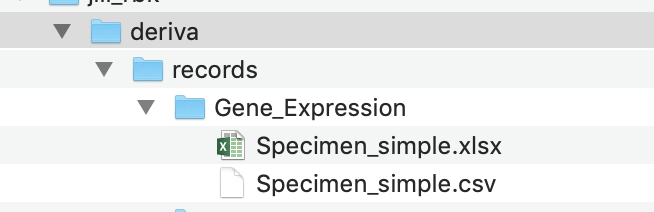
In this picture, both the CSV and Excel file are in the Gene_Expression folder; only the CSV file is necessary, but it’s convenient to keep them together.
Step 3: Upload the CSV file
Follow these instructions to upload your file, pointing the uploader at the records subfolder.
Step 4: Upload images
To upload them one at a time through the browser, follow the instructions at Submitting Specimen Data. To upload them in bulk, follow the instructions at Bulk uploading image files.
Step 5: Fill in any missing data
Follow the instructions at Submitting Specimen Data to add anatomical sites, antibodies, etc.
Step 6: Update the curation status
Your new records will initially have a Curation Status of “In Preparation” and will be visible only to consortium members. Change the status to “Submitted” to forward them on to the biocurator for review and release.